Making Printer Setting from your Computer
26
Page Setup
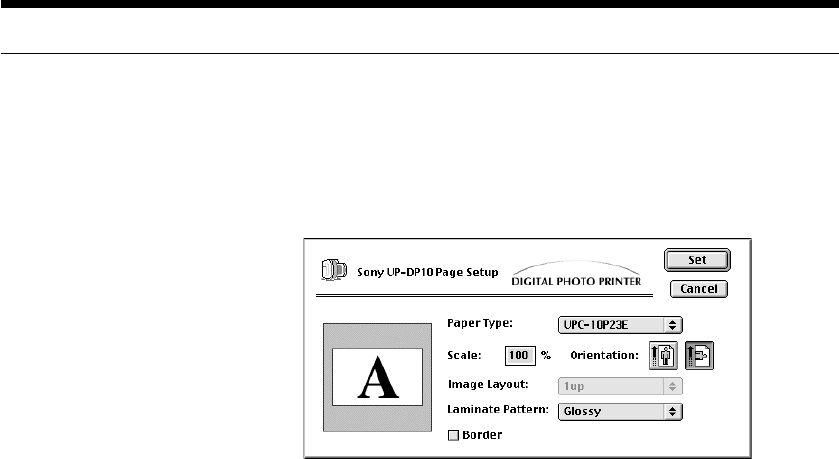
The “Page Setup” dialog box is used to make basic printing settings, such as
the paper type, the printing quality, etc. Make sure these settings have been
made before printing anything.
To display the “Page Setup” dialog box, select “Page Setup” from the “File”
menu. All of the items in the “Page Setup” dialog box are described below.
< “Paper Type”
Select the type of Print Pack that has been loaded in the printer from
among “UPC-10P23,” “UPC-10P34,” and “UPC-10S01.”
< “Scale”
Specify the enlargement/reduction ratio. Any integer value ranging from
“25%” to “400%” can be set for this ratio.
< “Orientation”
Select the printing orientation.
< “Image Layout”
This item becomes valid if “UPC-10S01” is selected for the paper type.
• If “1 up” is selected, then only one image is printed on each sheet.
• If “16 up” is selected, then 16 identical thumbnail images are printed on
each sheet.
< “Laminate Pattern”
Use this item to select one of the following three laminate processing
options for the print surface:
• If “Glossy” is selected, prints are produced with a glossy finish.
• If “Texture” is selected, prints are produced with a textured finish.
• If “Matte” is selected, prints are produced with a matte finish.
< “Border”
If this checkbox is checked (on), prints are printed with a white border
around the edges. If this option is selected, the image size that can be
printed is reduced.
