


SVAT ELECTRONICS
now you can see
CLEARVU3 36
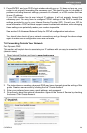
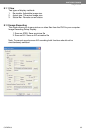
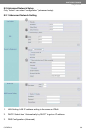
8.1.2.1 Save As JPEG
The following options allow you to customize how the jpeg image les are saved:
• No Limit: Unrestricted image storage (continuous jpeg saving)
• Number: Image storage according to number of frames. For example, if set to 50,
50 frames will be stored in 50 separate jpeg les.
• Save interval: Image storage according to one tenth of a second. For example,
if you enter 10, then one frame is stored per second. If you enter 50, then one
frame is stored every 5 seconds.
• Size: Image storage according to le size.
• Time: Image storage according to time. For example, if set to 60 seconds, the
system will capture jpeg les for 1 minute.
• Save Path: Specify the le path on your computer to save the jpeg les.
• Pre Name: Specify the prex for the jpeg les, and they will be numbered in the
order in which they are captured. For example, setting the Pre Name to “DVR_”
will generate les starting with “DVR_1”, DVR_2” and so on.
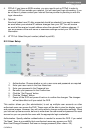
8.1.2.2 Save As AVI
• No Limit: Unrestricted video storage (continuous avi recording).
• Number: Video storage according to number of frames. For example, if set to 50,
50 frames will be stored per avi le.
• Save interval: Video storage according to one tenth of a second. For example, if
you enter 10, then one le is stored per second. If you enter 50, then one le is
stored every 5 seconds.
• Size: Video storage according to le size.
• Frame Rate: Specify the frame rate of each avi le.
• Time: Video storage according to time. For example, if set to 60 seconds, the
system will capture video for 1 minute.
• Maximum Number of Frame in Each File: Specify the maximum number of frames
in each AVi le.
• Save Path: Specify the le path on your computer to save the avi les.
• Pre Name: Specify the prex for the avi les, and they will be numbered in the
order in which they are captured. For example, setting the Pre Name to “DVR_”
will generate les starting with “DVR_1”, DVR_2” and so on.
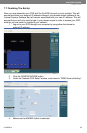
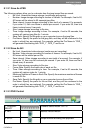
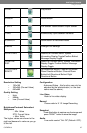
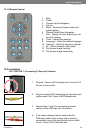
8.1.2.3 DVR Control
1. CHANNEL
SELECT
Camera Select Button: CH1~8
2. REC
Manual Record Button
3. STOP
Stops manual recording and playback.