


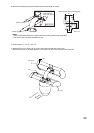
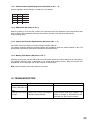


33
No.1
No.2
bps
OFF OFF 38,400
O N OFF 19,200
OFF O N 9,600
O N O N 4,800
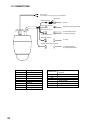
14.1.1. Communication Speed Setting Switch (DIP switch 2: No. 1 – 2)
Avoid changing the default settings. ("38,400 bps" is the default.)
14.1.2. OSD Switch (DIP switch 2: No. 3)
When this switch is set to the OFF position, the initial screen does not disappear until communications with
other equipment are established following initial operation after the power has been switched ON.
(Factory setting: OFF)
14.1.4. Memory Clear Switch (DIP switch 3: No. 7)
Switching on the power with this switch set to the ON position returns all camera settings to the initial setting.
The indication "Memory Clear" is displayed on the screen while clearing memory. After the indication has
disappeared, turn off the power and set the switch to the OFF position.
Note: Clock information and backup data are not erased.
14.1.3. Camera Unit Firmware Update Switch (DIP switch 3 No. 1 – 3)
For details, refer to the Camera Controller Software Operation Manual.
The Camera Controller Software Operation Manual and Installation Guide are made available on the TOA
product data download site (http://www.toa-products.com/international/).
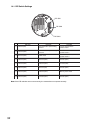
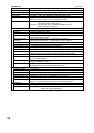
15. TROUBLESHOOTING
Remedy
Supply power to the camera.
Confirm that the cable type (category, null
modem or straight) is appropriate for the
connected port, then connect correctly.
Symptom
Camera does not start.
(Ready LED does not
light.)
LINK/ACT LED does
not light.
Possible Cause
Power is not supplied.
Cable is not correctly connected to
the unit's network terminal.