


94
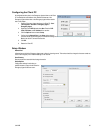
Configuring the Server for Remote Connection
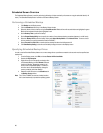
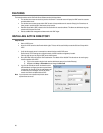
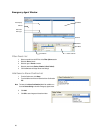
1. From the Display screen, click Setup.
2. Click Network.
3. Ensure that Disable Remote Control is cleared.
Note If you are using a Firewall, it may be necessary to adjust the port settings on both the recorder and the Firewall. Contact the
Network Administrator for more information.
4. Select Web Viewer (iDVR).
5. Click Apply.
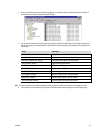
Note If no additional user accounts have been created the administrator account will be the only account that can connect to the
recorder remotely.
6. The recorder server is now ready to receive incoming connections from Remote Software, SCS, MDVR, or the Web Viewer.
Connecting to a Recorder Using Web Viewer
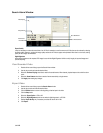
1. Open Microsoft Internet Explorer.
2. Enter the IP address of the recorder into the Address Bar.
3. When attempting this for the first time on a workstation a prompt will ask you to accept an ActiveX installation. Select Yes.
Note If you receive a message saying Internet Explorer® security settings do not allow you to download ActiveX components then you
will need to adjust the browser security settings. One way to do this is to add the IP address of the recorder to the trusted sites list
inside Internet Explorer® settings. Contact the System administrator for additional help with adjusting Internet Explorer settings.
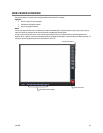
4. When the Web Viewer finishes loading, click GO!
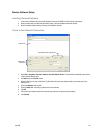
5. A login window will appear. Enter the Username and Password of an authorized user.
6. The cameras will display.
Closing the Web Viewer
To exit the Web Viewer close Internet Explorer.