


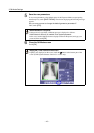


3.QA Mode Settings
– 24 –
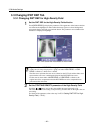
3.3.2 Changing DWT DEP for Low-Density Field
1
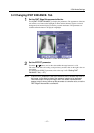
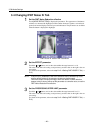
Set the DWT DEP for the Low-Density Field effective
Touch [LOW DENS.] to display the parameters. The appearance of the button switches
over between the highlight (in white outline characters against a colored background)
and normal display each time you touch the button. The parameters are available when
the button is displayed in highlight.
DWT DEP Screen with Parameters of HIGH and LOW DENS.
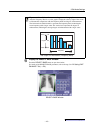
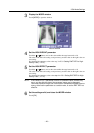
2
Set the STARTING DENSITY parameter of the Low-Density Field
Touch the or button, and set the value within the range between 0 to 30 range.
The value on the left is the setting saved previously, and the value on the right is the cur-
rent setting.
For details of the parameter, refer to the step 2 in 2.3.2 Setting DWT DEP for Low-
Density Field (→ P.12).
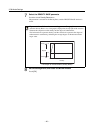
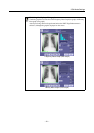
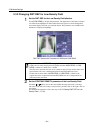
Representation of DWT DEP on a graph
A blue curve is always displayed on the graph, and when HIGH-DENS. or LOW-
DENS. is effective, a white curve is added.
The blue curve represents the tone curve selected on the LUT tab, and the white curve
represents the tone curve combining the blue and the DWT DEP tone curves.
In other words, when either of HIGH-DENS. or LOW-DENS. is effective, the
original tone curve compensation and the DWT DEP torn curve compensation are
performed at the same time.