


ZOOM (CONTINUOUS)ZOOM (CONTINUOUS)
NEXT SHOOTINGNEXT SHOOTING
01 02
79
Settings
4
78
:
1.5
SECSEC
:
SETSET
:
:
:
:
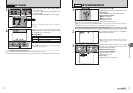
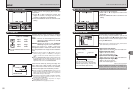
IMAGE DISP.IMAGE DISP.
CONT.CONT.
SETSET
1
3
2
OFFOFF
ZOOMZOOM
3
SECSEC
1.5
SECSEC
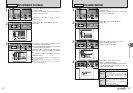
Use this setting to specify whether images are
displayed after shooting.
ZOOM: The center of the focusing position is shown
enlarged. Use this mode to check details of
image.
3 SEC/1.5 SEC: The image appears for about 3 or
1.5 seconds and is then recorded.
OFF: Images are recorded without being displayed.
●
!
In Long-period continuous shooting, the images do not
appear.
●
!
In top 3-frame continuous shooting and final 3-frame
continuous shooting, the images appear for a set time before
being recorded even when “OFF” is selected.
●
!
The color tones in images displayed when “3 SEC” or “1.5
SEC” is selected may differ slightly from those in the images
actually recorded.
á
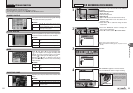
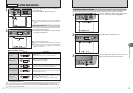
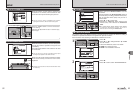
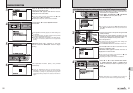
IMAGE DISPLAY
✽ How to use the SET-UP menu (➡P.76)
1
2
When this function is enabled, the enlarged image
appears on the LCD monitor. Using the Zoom
switch and the “a”, “b”, “d” or “c” button allows
you to check the focus.
1Move the Zoom switch to zoom in or out the
image.
2Press “a”, “b”, “d” or “c” to display another part
of the image.
●
!
When “`” quality setting is selected, the image cannot be
enlarged.
●
!
Press the “DISP/BACK” button to cancel the zoom setting.
●
!
This function is disabled when setting the continuous
shooting.
●
!
This function is disabled when selecting “À&d” in “q”
SHOOTING MODE.
Enlarging images
Press the “MENU/OK” button to take another
picture.
Navigation screen
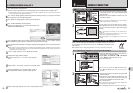
SET-UP
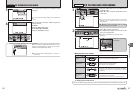
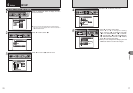
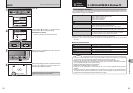
■ SET-UP menu options
Settings Display
Factory default
Explanation
Page
–
àBEEP
VOLUME
OFF/1/2/3 2
Sets the volume of the tone emitted when the camera
controls are used.
áIMAGE
DISP.
ZOOM/3 SEC/
1.5 SEC/OFF
1.5 SEC
Specifies whether an image checking screen (photography
result) appears after taking a picture.
The image is displayed for a few moments and then recorded.
The color tones in images recorded may differ from actual
color. Play back the recorded images to check them.
79
80
éFRAME
NO.
CONT./RENEW CONT.
Specifies whether frame numbers are assigned
consecutively from previous numbers or begin again.
83
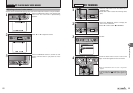
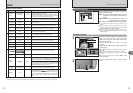
ïFORMAT
OK – Erases all files.
16
ì
DATE/TIME
SET – Corrects the date and time.
83
ó
TIME
DIFFERENCE
SET – Specifies the time difference settings.
ô
18
ENGLISH Specifies the language used for LCD monitor display.
–
úRESET
OK –
Resets all the camera settings (other than the DATE/TIME,
TIME DIFFERENCE, , VIDEO SYSTEM and
BACKGROUND COLOR) to the factory default values set at
shipment. A confirmation message appears when you press
“c”. To reset the camera settings, press the “MENU/OK”
button.
–
äSHUTTER
VOLUME
OFF/1/2/3 2
Sets the volume of the sound emitted when the shutter operates.
80
ã
PLAYBACK
VOLUME
SET 7 Sets the volume of playing back movie and voice memo.
81
ê
LCD
BRIGHTNESS
SET 0 Sets the LCD monitor brightness.
81
ëDIGITAL
ZOOM
ON/OFF OFF Specifies whether digital zoom is used together.
–
ö
BACKGROUND
COLOR
SET – Specifies the colors of menu and cursor.
82
î
AUTO
POWER OFF
5 MIN/2 MIN/OFF 2 MIN
Sets the time of turning camera off when camera is not
used.
–
õ
VIDEO
SYSTEM
NTSC/PAL – Specifies whether video output is set to NTSC or PAL.
93
89
òUSB
MODE
¶/®
¶: DSC (Mass storage device) mode
Provides a simple way to read images from an xD-Picture
Card and store images onto an xD-Picture Card.
®: PictBridge
When a printer that supports PictBridge is available, images
can be printed by connecting the camera directly to the
PictBridge-compatible printer without a PC.
1
2
3
82
Î
LCD POWER
SAVE
ON/OFF ON Darkens the LCD monitor when camera is not used.
✽ How to use the SET-UP menu (➡P.76)
●
!
Always turn the camera off when replacing the battery. Opening the battery cover or disconnecting the AC power adapter
without turning the camera off may cause the camera settings to revert to the factory default values set at shipment.