


SKU 68332 For technical questions, please call 1-800-444-3353 Page: 11
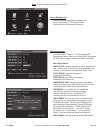
Record Setup - Resolution, Quality, Audio, Record Time
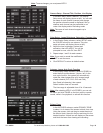
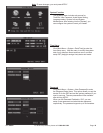
In the Main Menu select RECORD to enter the
Record Setup submenu (shown at left).
The Record Setup menu allows you set the recording
status (on/off) of each channel, the image resolution
and quality, and whether audio is on or off. This
menu also allows you to select recording mode
(recording as soon as the DVR has booted up vs.
scheduled recording), and recording le length.
Once a channel is set to “on”, the channel can record,
if it is set to “off”, the video from the channel will not
be recorded. Resolution options are D1, HD1 and
CIF; and Quality options are Best, Good and Normal
- lower quality means a smaller recorded le size.
Note: In NTSC format, pixel resolutions are:
D1: 704 x 480
HD1: 704 x 240
CIF: 352 x 240
When Audio is set to “On”, the system will also record
audio from the microphone (sold separately) attached to
the audio input, and will have audio output on playback
mode; if it is set to “off”, you can not record audio and
will have no audio output available on playback mode.
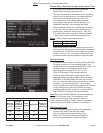
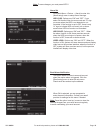
Record Schedule
To record 24 hours a day, set the Rec Mode to ALWAYS.
To record on motion or a set schedule, select Time
Schedule Record and select the SCHEDULE option. The
Schedule submenu will display (shown at left):
Recording options include CH-1, CH-2, CH-3,
CH-4 or All channels. Click the desired option.
To set up weekly schedules, select the box of the
recording status you want (ALARM (motion detected),
GENERAL, or NO RECORD) and then click on each
box in the schedule time line that you want this method
to apply to. You can use the [From – To] pull-down
menus at the bottom of the screen and the COPY button
to copy settings from one day to another day. After
completing the schedule, activate it by clicking APPLY.
Select DEFAULT to restore the system defaults.
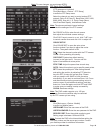
Note: Each box in the SCHEDULE sub-menu represents
one hour in a 24 hour cycle. The background color
stands for no recording, “Red” stands for alarm or
motion detected recording, “Green” stands for general or
normal recording and “Black” stands for no recording.
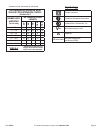
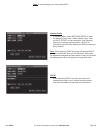
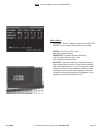
DVR Recording Time
The DVR recording time capacity varies depending
on the quality setting, the resolution option
and the number of cameras recording at the
same time. The chart at left shows examples of
maximum recording times at different settings.
Note: To save changes, you must press APPLY.
Sample Recording Hours
Maximun
Recorded
hours
Number
of Days if
recording
24 hours
a day
Quality
setting
Resolution
Number of
Cameras
Recording
2688 112
Lowest
(Normal)
CIF 1
672 28
Lowest
(Normal)
CIF 4
288 12 Best CIF 4