41
ENGLISH
COPYING
Using a DVD Burner
Supported discs: 12cm DVD-R, DVD-RW
•
Regarding DVD-R discs, only unused DVD-R
discs can be used. Regarding DVD-RW
discs, used DVD-RW discs can also be
used, but they need to be formatted before
recording. Formatting a disc deletes all
content recorded on the disc up until that
time.
•
Dual-layer discs cannot be used.
Regarding finalization after copying
The disc is automatically finalized so that
it can be played on other devices. After
finalizing, the disc is a play-only disc, so no
more files can be added.
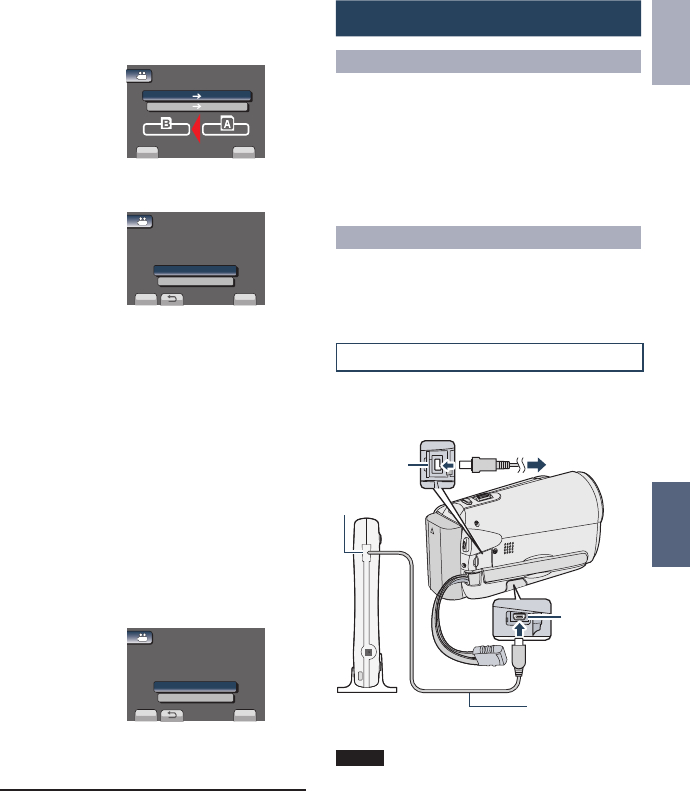
Connection with a DVD Burner
Preparation:
Turn on the camcorder first, then turn on the
DVD burner.
NOTE
Refer also to the optional DVD burner’s
instruction manual.
*
Use the USB cable that came with the DVD
burner.
DC
Connector
USB
Connector
AC Adapter
To AC Outlet
*USB Cable
USB Jack
DVD Burner
4
Select the direction.
[SLOT A SLOT B] or [SLOT B
SLOT A]
SET
QUIT
COPY VIDEO
SELECT COPY DIRECTION
SLOT B SLOT A
SLOT A SLOT B
5
Select the desired menu.
SET
QUIT
SELECT AND COPY
COPY ALL
SELECT THE OBJECT
TO BE COPIED
COPY VIDEO
•
[COPY ALL]/[MOVE ALL]:
Select this to transfer all files in the
recording medium.
When the size of all files in the SLOT A is
larger than the free space of the SLOT B,
only the files that can be contained
in the free space will be copied.
•
[SELECT AND COPY]/[SELECT AND
MOVE]:
Select when you want to transfer the
selected files.
1) Select the desired file, and touch OK.
The s mark appears on the file. To
select other files, repeat this step.
2) Select [EXEC].
6
Select [YES].
SET
QUIT
NO
YES
COPY QUANTITY:0009
START COPY?
COPY VIDEO
File transfer starts. When [COPYING
COMPLETED] / [MOVING COMPLETED]
appears, touch OK.
L To quit the screen
1) Select [QUIT].
L To stop the file transfer
1) Select [STOP].
2) When [QUIT?] appears, select [YES].
GZ-MS120UC_GB_EN.indb 41 12/16/2008 10:09:10 AM


