VIDEO PLAYBACK
20 EN
MasterPage: Left
Shuttle Search
Allows high-speed search in either direction during video
playback.
1) During playback, press 5 for forward search, or
3 for reverse search.
2) To resume normal playback, press 4/9.
● During playback, press and hold 5 or 3. The search
continues as long as you hold the button. Once you release
the button, normal playback resumes.
● A slight mosaic effect appears on the display during Shuttle
Search. This is not a malfunction.
TTENTION:
During Shuttle Search, parts of the
picture may not be clearly visible,
particularly on the left side of the
screen.
Blank Search
Helps you find where you should start recording in the
middle of a tape to avoid time code interruption.
(੬ pg. 19)
1 Load a cassette. (੬ pg. 15)
2 Set the VIDEO/MEMORY Switch to “VIDEO”.
3 Set the Power Switch to “PLAY” while pressing down
the Lock Button located on the switch.
4 Press MENU. The Menu Screen appears.
5 Press SET to select “t”. The VIDEO Menu appears.
6 Press r or t to select “BLANK SRCH”, and press
SET. The Sub Menu appears.
7 Press r or t to select “EXECUTE”, and press SET.
● The “BLANK SEARCH” indication appears and the
camcorder automatically starts reverse or forward search,
then stops at the spot which is about 3 seconds of tape
before the beginning of the detected blank portion.
● To cancel Blank Search midway, press 8.
NOTES:
● Before starting Blank Search, if the current position is at a
blank portion, the camcorder searches in the reverse
direction. If the current position is at a recorded portion, the
camcorder searches in the forward direction.
● If the beginning or end of the tape is reached during Blank
Search, the camcorder stops automatically.
● A blank portion which is shorter than 5 seconds of tape
may not be detected.
● The detected blank portion may be located between
recorded scenes. Before you start recording, make sure
there is no recorded scene after the blank portion.
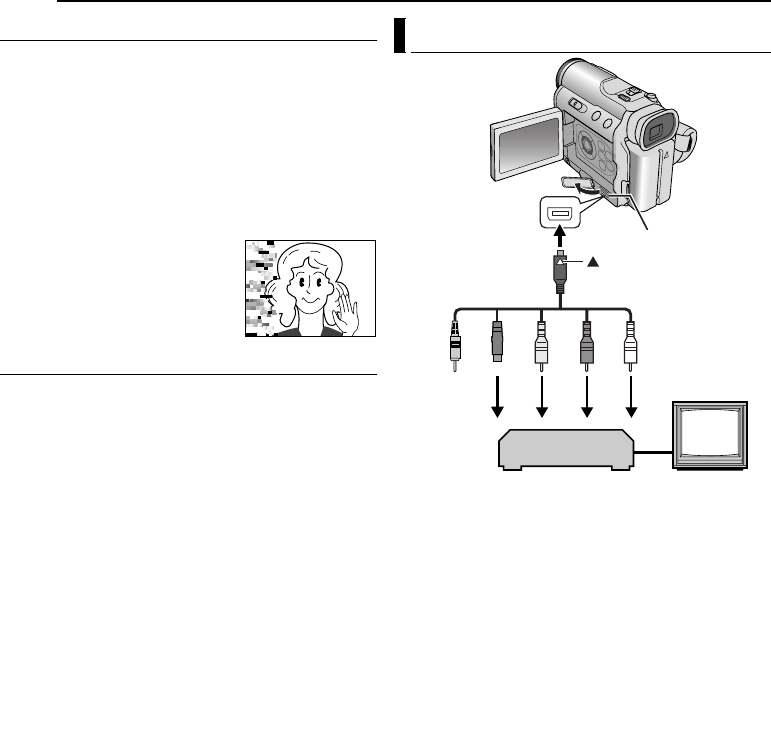
A Remote plug: Not connected (When not in use, keep
the Remote plug in its protective caddy.)
B Black to S-VIDEO IN (Connect when your TV/VCR has
S-VIDEO IN and A/V input connectors. In this case, it
is not necessary to connect the yellow video cable.)
C Yellow to VIDEO IN (Connect when your TV/VCR has
only A/V input connectors.)
D Red to AUDIO R IN*
E White to AUDIO L IN*
* Not required for watching still images only.
1 Make sure all units are turned off.
2 Connect the camcorder to a TV or VCR as shown in
the illustration.
If using a VCR, go to step 3.
If not, go to step 4.
3 Connect the VCR output to the TV input, referring to
your VCR’s instruction manual.
4 Turn on the camcorder, the VCR and the TV.
5 Set the VCR to its AUX input mode, and set the TV to
its VIDEO mode.
6 Start playback on the camcorder. (੬ pg. 19)
To choose whether or not the following displays
appear on the connected TV
● Date/Time
Set “DATE/TIME” to “AUTO”, “ON” or “OFF”. (੬ pg. 29, 33)
Or, press DISPLAY on the remote control to turn on/off the
date indication.
● Time Code
Set “TIME CODE” to “ON” or “OFF”. (੬ pg. 29, 33)
● Indications other than date/time and time code
Set “ON SCREEN” to “OFF”, “LCD” or “LCD/TV”.
(੬ pg. 29, 33)
Connections To A TV Or VCR
12345
TV
VCR
Open the cover.
To S/AV connector
S/AV/Editing cable
(provided)
mark
GR-DZ9_DZ7US_05Video.fm Page 20 Monday, June 14, 2004 10:02 AM


