ADVANCED FEATURES
EN 29
MasterPage: Advan_Heading0_Right
MENUS FOR DETAILED ADJUSTMENT
This camcorder is equipped with an easy-to-use, on-
screen menu system that simplifies many of the more
detailed camcorder settings. (੬ pg. 29 – 33)
1 For Video and D.S.C. Recording Menus:
● Set the VIDEO/MEMORY Switch to “VIDEO” or
“MEMORY”.
● Set the Power Switch to “M” while pressing down the Lock
Button located on the switch.
For Video Playback Menus:
● Set the VIDEO/MEMORY Switch to “VIDEO”.
● Set the Power Switch to “PLAY” while pressing down the
Lock Button located on the switch.
● For D.S.C. Playback Menus, refer to “D.S.C. PLAYBACK”
(੬ pg. 24).
2 Open the LCD monitor fully. (੬ pg. 17)
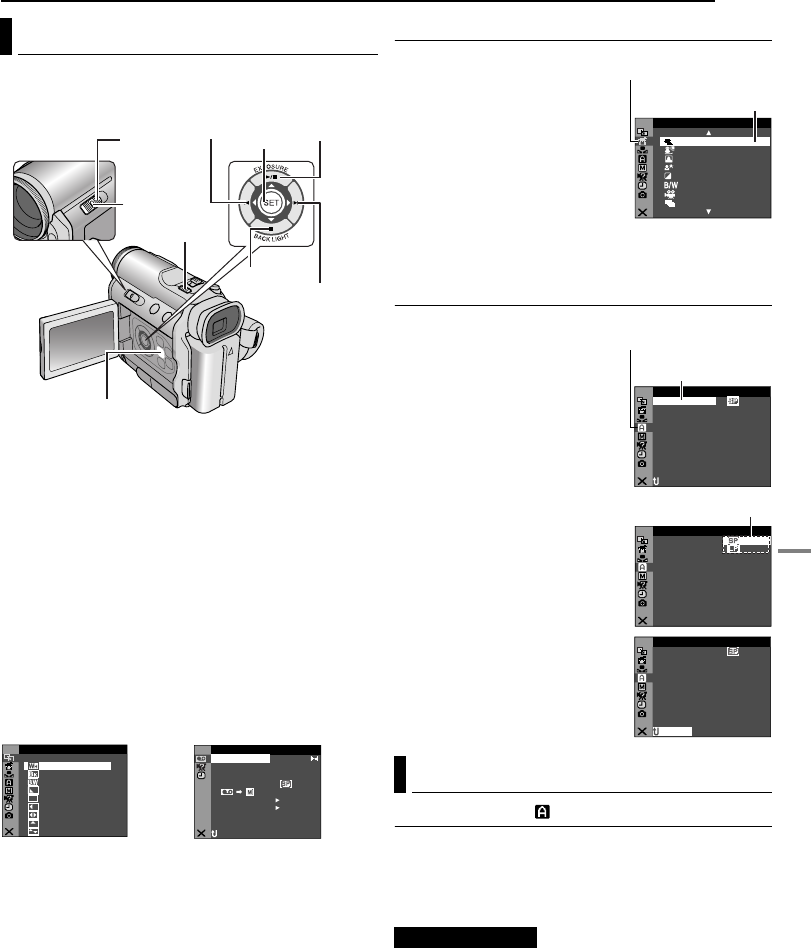
3 Press MENU. The Menu Screen appears.
4 Press r or t to select the desired function, and press
SET. The selected function menu appears.
5 Setting procedure hereafter depends on the selected
function.
Menus without Sub Menus
v WIPE/FADER (੬ pg. 37)
r PROGRAM AE (੬ pg. 38)
u W. BALANCE (੬ pg. 37)
1) Press r or t to select the
desired parameter.
● Example: r PROGRAM AE
Menu
2) Press SET. Selection is
complete. The Menu Screen
returns.
● Repeat the procedure if you wish
to set other function menus.
3) Press SET. The Menu Screen closes.
Menus with Sub Menus
m CAMERA (੬ pg. 29)
q MANUAL (੬ pg. 30)
s SYSTEM (੬ pg. 31)
n
CAMERA DISPLAY (
੬
pg. 31)
o DSC (੬ pg. 32)
t VIDEO (੬ pg. 32)
n VIDEO DISPLAY (੬ pg. 33)
1) Press r or t to select the
desired function, and press SET.
The Sub Menu appears.
● Example: m CAMERA Menu
2) Press r or t to select the
desired parameter.
3) Press SET. Selection is
complete.
● Repeat the procedure if you wish
to set other function menus.
4) Press SET. The Menu Screen
returns.
● Repeat the procedure if you wish
to set other function menus.
5) Press SET. The Menu Screen
closes.
CAMERA
The “m CAMERA” settings are effective when the Power
Switch is set to both “A” and “M”. However, the menu
settings can be changed only when the Power Switch is
set to “M”.
[ ] = Factory-preset
[SP]: To record in the SP (Standard Play) mode
LP: Long Play—more economical, providing 1.5 times
the recording time.
Changing The Menu Settings
Power
Switch
Lock Button
VIDEO/
MEMORY
MENU
r (Up)
SET
t (Down)
w (Left)
e (Right)
HIDE
– FA R ET
LADE
– FA R
KC
.WDE
– FA R
RNPE
C WI –
RE
NDPE
W WI –
WO
IDPE
S WI –
E
ORPE
D WI –
RO
PE
S WI
–
LL
W
B
B
O
I
L
O
C
R/F
DIPE WA
E
UTPE
S WI –RETH
F
OF
ID
O V E
OFONR–ATI NA R F
±0 N–HRO SY C
0
.
E C–MOD RE
OFCO Y P F–
RC
A
KS BL N H
OFPU
A
IN S/ V T F–
NRETUR
DU
DMSO N EO
L.V.DENA I
–STRE EO
Screen for Video and D.S.C.
Recording Menu
Screen for Video Playback
Menu
Recording Menus
REC MODE
E RA
ROG PM
A
OR S SP T
O W
SN
OT
I SP
L GHT
TWILIGHT
SEPIA
MONOTONE
CLASSIC FILM
STROBE
Selected menu icon
blinks.
Selected
parameter
ME
A CA R
–
12ODU –D M SO N E TIB
40
O
– ZO M
x
FUDEA – MO SN P LL
AG
I
– UP GA N
C
MAIOV –GAT NA I N AUN L
NRETUR
C
MODRE
E
Selected menu icon
blinks.
Selected function
ME
A CA R
–
C
MODRE
E
NRETUR
Sub Menu
ME
A CA R
–
12ODU –D M SO N E TIB
40
O
– ZO M
x
FUDEA – MO SN P LL
AG
I
– UP GA N
C
MAIOV –GAT NA I N AUN L
C
MODRE
E
NRETUR
ADVANCED FEATURES
CONTINUED ON NEXT PAGE
GR-DZ9_DZ7US_07Advanced.fm Page 29 Thursday, May 27, 2004 7:46 PM


