


20
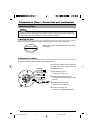
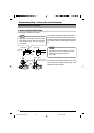
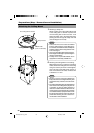
1.
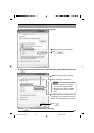
Attaching a safety wire.
Attach a safety wire to the Ceiling Mount and
to the ceiling slab or channel to prevent the
unit from being able to fall to the floor. First
attach the safety wire to the Ceiling Mount by
passing the wire through the safety wire hole
(see the diagram on the left).
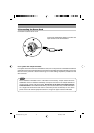
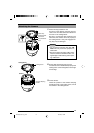
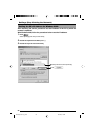
2.
Attaching the Ceiling Mount to the ceiling.
While taking care not to catch the connection
cables, attach the Ceiling Mount to the ceiling
using four screws (as shown in the diagram).
Use 8-32 UNC-sized (M4-sized) screws or
bolts. If woodscrews are used, use those with
a diameter of 4.1 mm.
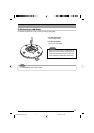
Attaching the Ceiling Mount
Note
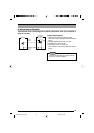
• Connect the wire so that it can be insulated
from the ceiling structure. If the ceiling struc-
ture is made of a metallic material, inadequate
insulation with the camera may produce noise
in the video signal.
• Use a wire and ceiling attachment having suf-
ficient length and strength to prevent danger in
case the camera drops.
•A safety wire is not provided. Please use an
appropriate commercially available wire.
Note
• Be sure to use four screws and attach them
firmly. If the screws are not tightened firmly, dust
and moisture may enter the unit via the screw
holes.
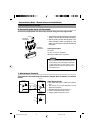
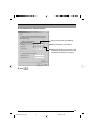
• The rubber seals attached to the Ceiling Mount
screw holes of the Ceiling Mount play the role
of insulation in case the ceiling structure is
made of a metallic material as well as the role
of drip proofing. If the ceiling structure is made
of a metallic material, improper insulation with
the camera may produce noise in the video. To
prevent this occurring, be sure to ensure cor-
rect insulation of the installation.
To a ceiling slab or channel
Ceiling Mount
Screws
Safety wire hole
Rubber seals
(Four on each side)
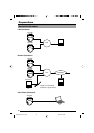
Preparations (Step 1 Connection and Installation)
VN-C655(reed me)_p2-29 04.9.22, 8:18 PM20