


78
ķ
The sub-modes stroboscope and Metz remote are not supported by
the second reflector.
• With the ML button ቱ a modelling light (ML) can be triggered if the flash is
ready. A modelling light is a high frequency stroboscopic flashlight. For a
duration of approx. 4 seconds the impression of quasi-permanent light is
created. With the modelling light the light distribution and shadow forma-
tion can be judged before a photo is taken.
Press the ML button ቱ for approx. 2 seconds to trigger the modelling light.
In the cordless Metz remote system the triggering of the modelling light on
the controller also triggers the modelling light of all the slave flash units that
are equipped with a modelling light function.
• With the switch LOCK ቴ the buttons of the control unit can be locked
against unintentional incorrect settings.
Push the button ቴ to the top position (LOCK) to lock the controls. The sym-
bol appears in the display.
To unlock the controls push the button ቴ to the bottom position.
The manual firing button on the handle mount ቩ ቲ and control unit
as well as the ML button ቱ are not affected by the lock!
5.2 Controls and displays on the control unit
The four buttons of the control unit are endowed with different functions. The
particular function allocated is in each case shown directly above the button
in the display of the control unit.
Upon first pressing the button the display lighting is initially activated for
approx. 10 sec. With every further press of the button the illumination time is
extended and the corresponding function is chosen or activated.
The flash mode is selected by means of the button controls (TTL, automatic A,
manual M, Stroboscopic, etc). Depending on the flash mode various flash
parameters (e.g. aperture, zoom position of the reflector, flash exposure cor-
rection value, partial light output, ISO value, stroboscopic frequency, etc) or
additional special functions can be set.
☞
Button explanation:
Button “Mode“ Call the menu and set the flash mode (Mode menu).
Button „Para“ Call the flash parameters and change settings, e.g. aperture,
ISO etc (Parameter menu).
Button „SEL“ Call special functions and set (Select menu).
Button “Set“ Set button to confirm the choice of a special function.
Button Manual firing button ቴ. Trigger test flash.
Button Return button to confirm settings.
Buttons ̆̄ UP / DOWN – buttons to move inside a menu.
Buttons + — PLUS / MINUS – buttons to change the setting values.
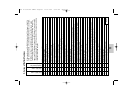
In the display of the control unit the following parameters can be shown:
Flash mode, flash parameters, maximum flash range and activated special
functions. The current display extent in each case depends on the flash mode
selected, the type of camera and the SCA adapter or standard foot 301.
6. Flash modes (Mode - menu)
The flash unit supports the flash modes TTL, automatic A, manual M und stro-
boscopic .
When operating the flash unit with an SCA adapter from the SCA
3002 system additional flash modes may be supported, depending on
the camera system (manufacturer) and camera type. These can be
selected or activated in the mode menu.
Setting procedure
• Press the “Mode” (flash mode) button repeatedly until “Mode” appears in
the display.
• Set the flash mode required (TTL, automatic A, manual M, etc) with the but-
tons UP ̆ and DOWN ̄. The flash mode selected is highlighted with a
bar. The setting is immediately active.
• Press the button “Return” . The display returns to its normal appearan-
☞
705 47 0041.A4 76MZ-5 digital 15.03.2007 8:28 Uhr Seite 78