


68
Adjustments and Settings for Recording
: Setting Time Data
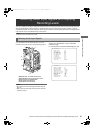
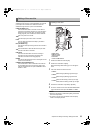
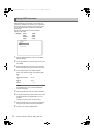
1 Position the DISPLAY switch at [TC].
2 Position the TCG switch at [SET].
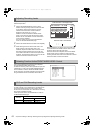
3 Set the menu option TC MODE to “DF” or “NDF”. “DF”
steps the time code in drop frame mode, and “NDF”
steps it in non-drop frame mode. However, the camera
always operates in “NDF” for 24P, 24PA and 24PN
(Native) modes.
The menu option TC MODE can be found in the <TC/
UB> screen on the MAIN OPERATION page.
Note
Switching between “DF” and “NDF” is operative only
when the system frequency of the unit is set to
59.94 Hz.
4 Use the cursor buttons to set the time code.
The time code setting range extends from 00:00:00:00
to 23:59:59:29 (59.94 Hz), 23:59:59:23 (24PN) or to
23:59:59:24 (50 Hz).
Z button:
Shifts the target (blinking) digit to the right.
Y button:
Shifts the target (blinking) digit to the left.
U button:
Advances the blinking number by one digit.
V button:
Winds back the blinking number by one digit.
5 Change the position of the TCG switch.
[F-RUN] steps the time code in Free run mode, and [R-
RUN] set it in Rec run mode.
Notes
When the unit is in the 24P or 24PA mode, time code
settings are adjusted to the 5-frame unit. For 24PN
(Native) mode, it is adjusted for counting by the 4-
frame unit. The time code cannot be set when
recording in the 24P, 24PA, and 24PN (Native)
formats.
When the TCG switch is positioned at [SET],
thumbnails cannot be manipulated.
When the TCG switch is positioned to [R-RUN], the time
code recorded on the last frame of the last recorded clip
(with the latest recording date) on the P2 card is read, and
this time code can be used again.
When the menu option FIRST REC TC is set to “REGEN”
and a P2 card is removed or inserted or the target recording
card is changed with the user button assigned the SLOT
SEL function, the same time code is added to the last
recorded clip on the target P2 card. When no clips have
been recorded, recording starts from a value generated by a
time code generator in the unit.
The menu option FIRST REC TC can be found in the <TC/
UB> screen on the MAIN OPERATION page.
If the menu option FIRST REC TC is set to “PRESET”, if the
time code has been set or reset, or if the time code has been
switched from Free run to Rec run, it is possible to
regenerate the time code as the last time code of a clip
recorded on the P2 card.
This action requires you to preset the RET SW menu option
on the <SW MODE> screen to “R.REVIEW” and the REC
REVIEW REGEN menu option on the <TC/UB> screen to
“ON”.
1 Make sure the P2 card to record the data. To regenerate
the time code of the last recorded clip when more than
one P2 card is inserted, press the THUMBNAIL button
to open the thumbnail screen.
2 Check the P2 card which recorded the last clip
displayed on the screen, and then switch the slot with
the user button assigned the SLOT SEL function so that
data will be recorded on the P2 card.
3 Press the RET button on the lens. The message “TC
REGEN” is displayed in the viewfinder. During the next
recording, the time code of the last recorded clip on the
card will be regenerated.
Notes
When a card with recorded data is changed, the time code
of the last recorded clip on the changed P2 card will be
regenerated.
This function is disabled during recording or Free run.
Even during battery replacement, the backup mechanism
functions, allowing the unit to operate continuously.
If SYSTEM MODE is changed, a free-run time code may
shift. After turning on the power again, confirm the time code
and reset if necessary.
Note
When the POWER switch has been switched [ON] [OFF]
[ON], the backup accuracy of the time code in Free run
mode is about ±2 frames.
Setting the Time Code
Regeneration of Time Code
Regeneration function using REC REVIEW
Time code function during battery replacement
AJ-HPX3700G-VQT1V68_eng.book 68 ページ 2008年10月15日 水曜日 午後6時38分