


13
R E C
SAVE
2
3
4
2
OPEN/EJECT
1
1
1
4
3
2
1
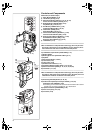
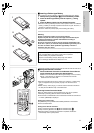
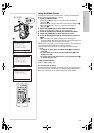
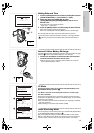
Attaching the Lens Cap
To protect the Lens surface, attach the Lens Cap.
1
Pass the loop of the Lens Cap Cord through the Lens Cap
Installation Hole on the Palmcorder.
2
Pass the opposite side of the Lens Cap Cord through the
cord’s hoop.
3
Pull the Lens Cap to the direction of the arrow.
4
Attach the Lens Cap.
≥The removed Lens Cap can be hooked onto the Grip Belt
1
. (When you
are not recording, be sure to keep the Lens Cap attached to the Lens for
protection.)
≥If the supplied Lens Hood for MEGA STILL
TM
Pictures Recording is
attached, the Lens Cap cannot be attached.
~~~~~~~~~~~~~~~~~~~~~~~~~
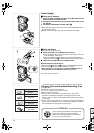
Adjusting the Grip Belt
Adjust the length of the Grip Belt to the size of your hand.
1
Pass your hand through the Grip Belt and adjust its length.
2
Fold back the end of the Grip Belt to securely fasten the
velcro tape closure.
≥The Grip Belt can also be adjusted in SD Camera Style.
~~~~~~~~~~~~~~~~~~~~~~~~~
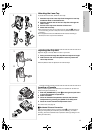
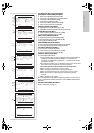
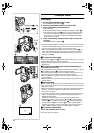
Inserting a Cassette
When power is supplied to the Palmcorder, the cassette can be taken out
without turning the Palmcorder on.
1
Slide the [OPEN/EJECT] Lever
1
to the right and pull down
to open the Cassette Compartment.
2
Insert a Cassette.
3
Close the Cassette Compartment and lock the Cassette
Compartment by pressing the [PUSH TO CLOSE] mark.
4
Close the Lower Cassette Compartment Cover.
≥For other notes, see page 60.
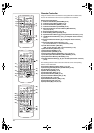
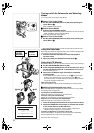
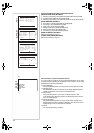
ªAccidental Erasure Prevention
Opening the accidental erasure prevention slider
2
on the cassette (by
sliding it in the [SAVE] arrow direction) prevents recording. To enable
recording, close the accidental erasure protection slider (by sliding it in the
[REC] arrow direction.)
1
2