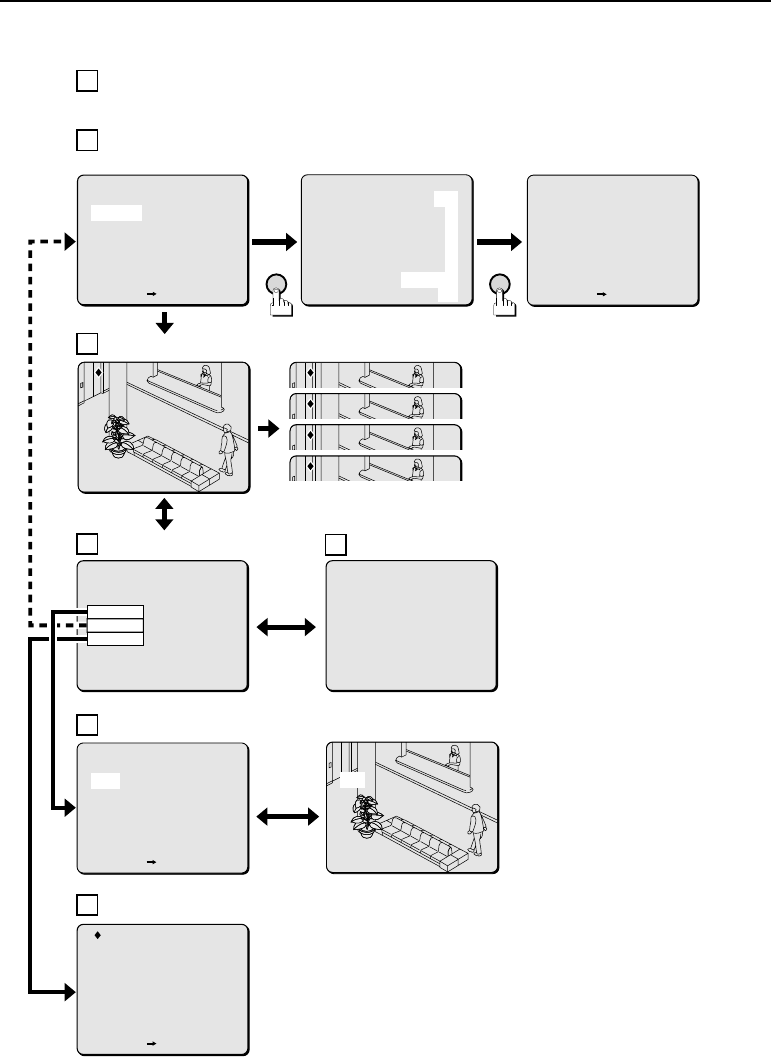
FROM RECORDING TO PLAYBACK
When using this camera for recording and playback for the first time, follow the steps given below. Refer to
the reference pages given for more details on each step.
PRE1-ALARM REC PRE1-ALARM REC
REMAIN SHOTS:6834 REMAIN SHOTS:6834
PRE1-ALARM REC
REMAIN SHOTS:6834
POST1-ALARM REC POST1-ALARM REC POST1-ALARM REC
PRE2-ALARM REC PRE2-ALARM REC PRE2-ALARM REC
POST2-ALARM REC POST2-ALARM REC POST2-ALARM REC
SUSPICION REC SUSPICION REC SUSPICION REC
3
Record the images. (See page 39)
CONDITION
TIME: 08/02/2002 15:15:20
PRE: 15MIN POST: 30MIN
SUSPICION: 150/ 6834PCS
FRAMERATE: 3FPS ST/DL:OFF
FILE ID: A ID:
COMMENT:
[MENU] (MAIN MENU)
(SETTINGS)
CLOCK SET
SYSTEM SET
HDD SET
SUMMER TIME/DAYLIGHT SET
KEY WORD SET
[MENU] (MAIN MENU)
4
Selection
DISK CLOSING
2
Set the date and time. (See page 22)
(PLAYBACK)
ALARM
SUSPICION
ARCHIVE
EXTENSION
[MENU] (MAIN MENU)
(CLOCK SET)
YEAR------------------2002
MONTH----------------- 08
DAY------------------- 02
HOUR------------------ 15
MINUTE---------------- 15
SECOND---------------- 20
FORM------------MM/DD/YYYY
CLOCK START----------- YES
(CLOCK START)
08/02/2002 15:15:20
[MENU] (SETTING)
5
Play back the recorded images. (See page 49)
6
View details of the time and the hard disk recording capacity. (See page 37)
7
1
Turn on the power. (See page 1 3)
(MAIN MENU)
RECORD START
PLAYBACK
SETTINGS
CONDITION
Set the hard disk to the standby condition when you
have finished using the camera. (See page 18)
The camera itself does not have a power switch. Connect the accessory AC adaptor and
relay connector, and then insert the power plug into a wall outlet.
Recording is not possible until the time has been set.
SET SET
(FUNCTIONS) (FUNCTIONS)
ZOOM ZOOM
ON SCREEN DISPLAY ON SCREEN DISPLAY
COPY COPY
DELETE DELETE
2001/08/02 13:42:35 1/3 2001/08/02 13:42:35 1/3
(FUNCTIONS)
ZOOM
ON SCREEN DISPLAY
COPY
DELETE
2001/08/02 13:42:35 1/3
L42A4/US (DSR-C100) GB 2001, 4, 16
English 17


