52
GB
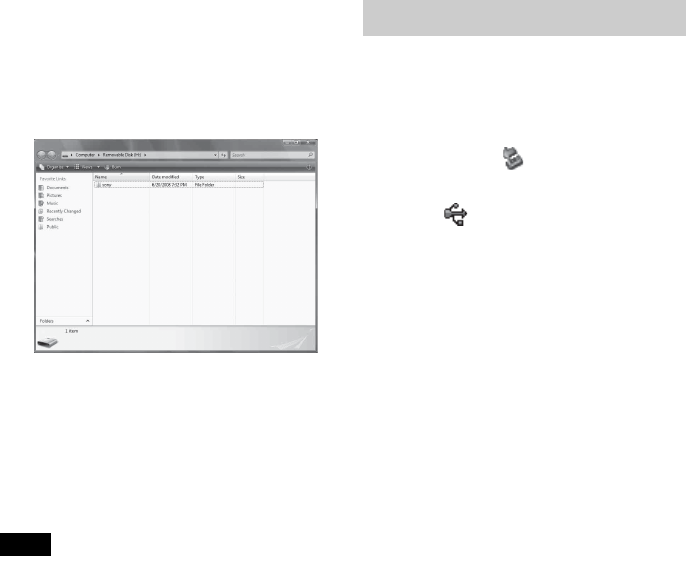
4 When the [AutoPlay] window
appears on the computer display,
click [Open folder to view files].
If the [AutoPlay] window does not appear,
click [Computer (My Computer)] in the
Start menu, then open the removable disc.
5 Move the cursor in this window and
right-click, then click [New] -
[Folder].
Name this new folder. In this manual, the
folder name “sony” is used as an example.
6 Double click to open this “sony”
folder.
7 Open the folder that contains the
image file you want to copy, and
copy the image file to the “sony”
folder by using drag-and-drop.
Notes
• When saving images from a computer in the
internal memory, make a folder in the internal
memory on a computer and save the images in this
folder. If you do not make a folder, you can only
save up to 512 images. In addition, the number of
images may be reduced depending on the file name
length or character type.
• If you edit or save an image file on a computer, the
shooting date of the file may be changed or erased.
In this case, images may not be displayed in order
of the shooting date on the index image display.
• When images from the computer are saved in the
internal memory of the photo frame, the image files
are saved without being compressed. As a result, a
fewer number of images may be saved in the
internal memory of the photo frame.
• Image files made or edited on a computer may not
be displayed. Image files set to “Read Only” on a
computer cannot be deleted on the photo frame.
Cancel “Read Only” before saving image files from
a computer on the photo frame.
Disconnect the USB cable or turn the photo
frame off after disconnecting it from your
computer.
1 Double-click (disconnection) on
the Task Tray.
2 Click (USB Mass Storage
Device) t [Stop].
3 Click [OK] after checking the drive
you want to remove.
Disconnecting your computer


