


Administrating the Camera
Using the 802.1X Authentication Function — 802.1X Menu
58
10
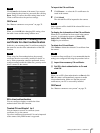
Set the following items:
Friendly name: Type “authenticator” as an
example.
Client address (IP or DNS): IP address of the
authenticator
Client-Vender: RADIUS Standard
Shared secret: Specify the shared secret to be set
in the authenticator.
Adding a user
1
Open Active Directory Users and Computers
from Administrative Tools of Windows menu.
2
Select Users of the domain with which you want to
add a user and right-click.
3
Select New from the context menu, then select
User.
4
Set the following items to configure a new user:
For example, the log-on user name “1XClient” is
assumed for explanation purposes.
First name: 1XClient
User logon name: 1XClient@<domain name>
Password: Specify a password. Then select
Password never expires in account options.
5
Select the user to be added and right-click.
6
Select Properties from the context menu.
7
Set the following items:
Dial-in tab: Select Allow access in Remote
Access Permission (Dial-in or VPN)
Member Of tab: Add “Wired_802.1X_Group”.
The preparations for configuring a 802.1X network are
now completed.
Proceed to issue the certificate to be imported to the
camera.
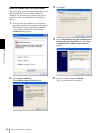
Issuing the CA certificate
Prepare a Windows client PC (called “client PC”
hereafter) to temporarily store the certificate, and
configure so that the client PC and Windows Server
2003 computer can be connected through the network.
1
Start Internet Explorer on the client PC.
2
Type the CA’s URL in the address bar, and click Go
To.
The CA’s URL is normally as follows:
The “Microsoft Certificate Services” page opens.
Note
If the Microsoft Certificate Service page does not appear
using the URL above, check the following:
– Is the service of the Web site enabled on Internet
Information Service (IIS)?
– Is Certificate Services enabled?
– Is the firewall or antivirus software setting on the
client PC blocking connection?
– Are the network configuration and Internet
Explorer settings on the client PC correct?
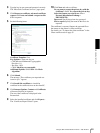
3
When Internet Explorer prompts entering the log-in
user and password, type the user name as follows.
Example: when the user name is “1XClient” and
the domain name “localnetwork.net”
1XClient@localnetwork.net
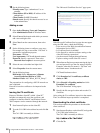
4
Click Download a CA certificate, certificate
chain, or CRL.
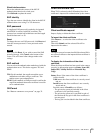
5
Select Base 64 in Encoding method and click
Download CA certificate.
The “File Download” dialog opens.
6
Specify the file storage location and save the CA
certificate.
After saving the CA certificate, import it to the camera.
The CA certificate import procedure is completed.
Downloading the client certificate
This section explains the procedure to download the
client certificate.
1
Start Internet Explorer on the client PC and type the
CA’s URL in the address bar.
The CA’s URL is normally as follows:
2
Click Go To.