


31
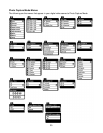
ViviLink Menu
The ViviLink technology allows you to quickly and easily upload your camera‟s photos and videos to
the social networks of your choice with the accompanying Vivitar Experience Image Manager
application.
1. Press the MENU button to open the menus for the current mode.
2. Press the joystick button LEFT or RIGHT to scroll and select the ViviLink menu.
3. Press the joystick button UP or DOWN to highlight the desired menu option.
4. Press the OK button on the joystick to select and confirm the highlighted menu option.
5. A selected option icon will appear on the selected item.
6. Press the joystick button LEFT or RIGHT to select the next menu item.
7. Press the MODE button to exit the menu and return to your previous mode.
8. An icon will appear on the image with the selected ViviLink destination site.
9. Remember that the ViviLink feature is deactivated by default. A ViviLink destination will only be
assigned to a photo or video if you manually set it from this menu.
Changing the ViviLink destination site will also make the selected site the new default ViviLink
option. A new default can be selected at any time using this menu.
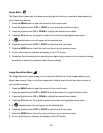
Protect/Lock Menu
Pictures and Videos taken with your camera can be protected or “locked” to prevent any deletion or
alteration being made to the files.
1. Press the MENU button to open the menus for the current mode.
2. Press the joystick button LEFT or RIGHT to scroll and select the Protect/Lock menu.
3. Press the joystick button UP or DOWN to highlight the desired menu option.
4. Press the OK button on the joystick to select and confirm the highlighted menu option.
5. A selected option icon will appear on the selected item.
6. Press the joystick button LEFT or RIGHT to select the next menu item.
7. Press the MODE button to exit the menu and return to your previous mode.