


17
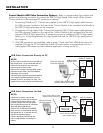
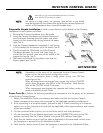
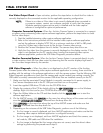
INFECTION CONTROL SHEATH
1. Remove the Camera Handpiece from the holder.
2. Insert the Camera Handpiece tip between the second
and third layers (between the outer paper and plastic
layers) with the camera/light facing towards the paper
layer. See A.
3. Push the Camera Handpiece completely in until the tip
is fully inserted into the narrow tip of the sheath. See B.
4. Gently squeeze the illuminated tip of the Camera
Handpiece between the thumb and index finger to
ensure that the optically clear area of the sheath is flat
against the lens tip. See C.
5. Peel away and discard the top plastic layer and the
bottom paper layer. See D.
NNOOTTEE::
For optimum image clarity, the optically clear section of the sheath
must be aligned with the camera lens by facing the camera/lightsource
section of the handpiece down toward the paper layer.
MAKE SURE TO USE A NEW DISPOSABLE INFECTION CONTROL
SHEATH
(PN A5123) FOR EACH PATIENT.
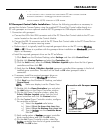
Disposable Sheath Installation - Install a new infection control sheath on the Camera
Handpiece for each patient as follows:
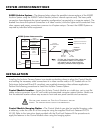
NNOOTTEE::
Depending on the setup of the associated Acclaim Camera System,
power turn on for each system configuration varies.
When all components share a single power source, turn ON that
power source first.
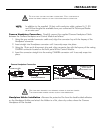
When all components are plugged into a power strip with an ON/OFF
switch, place the power strip switch to the ON position. Verify that the
light on the ON/OFF switch illuminates.
When components are plugged into separate wall outlets, make sure
power is available at each outlet.
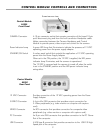
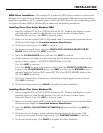
Power Turn On - Perform the following procedure as necessary to turn the power on for operation
of the Acclaim Camera System.
1. Review the Installation Section as necessary and make sure that the Acclaim Camera
System components are setup and connected for the applicable operating configuration.
2. If not connecting to a computer system, proceed to step 3. When connecting to a computer
system, turn on the computer and verify that the applicable video capture software and camera
drivers are installed.
3. On the connected video monitor, turn on the Power switch and verify operation.
4. On the associated Control Module front panel, set the STANDBY/ON switch to the ON
position and verify that the Control Module front panel LED indicator lamp lights.
5. Verify that the camera turns on and live video is displayed on the associated monitor when
the handpiece is removed from the Handpiece Holder.
6. Verify that the camera turns off when the handpiece is returned to the Handpiece Holder.
ACTIVATION