


9
AXIS 214 PTZ
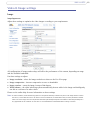
Control panel
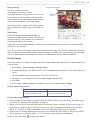
Click the Ctrl panel button to display the control panel, which provides
the following settings:
• Auto focus: Au
tomatically adjusts the image focus.
• Auto iris: Automatically adjusts the am
ount of light reaching
the camera and gives the best results, This also protects the
image sensor from strong light.
• Backlight comp: Enabling backli
ght compensation makes the
subject clearer if the image background is too bright, or if the
subject is too dark.
• IR cut fil
ter - when set to off, the camera will be able to “see”
infrared light, e.g. at night, thus making the image clearer. The
image is shown in black & white when the IR cut filter is off. Set
to Auto to automatically turn the filter off when the available
visible light falls below the minimum requirement.
The control panel can also show custom shortcuts, which
are configured
from PTZ Configuration > Advanced > Ctrl Panel.
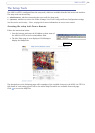
Viewer controls
The default viewer to use for displaying moving images is selected from Setup > Live View Config >
Layout.
The AMC viewer toolbar is
available in Microsoft Internet Explorer only. See AXIS Media Control, on page
12 for more information. The AMC viewer toolbar displays the follo
wing buttons:
The Play/Stop buttons start and stop the live
video stream.
The Snapsh
ot button takes a snapshot of the currently displayed image. The Snapshot function
and the target directory for saving snapshots can be
configured from AMC (AXIS Media
Control), which is available from the Windows Control Panel (Internet Explorer only).
Click the View Fu
ll Screen button and the video image will fill the entire screen area. No other
windows will be visible. Press Esc (Escape) on the computer keyboard to
cancel full screen view.
The record button is used to record the current (MPEG-4) video stream.
The location where the
image file is saved can be speci
fied using the AMC control panel. To enable recording, Select
Live View Config > Viewer Settings > Enable recording button.
These buttons change the navigation mode. Selecting Center will move
the camera view to
center on the position that
was clicked. Joystick mode will move the camera in the direction
indicated by a mouse click, relative to the center of the image. The further from the center the
image is clicked, the greater the movement. These modes can also be selected by right-clicking
in the image.
Click the Spe
aker and Microphone buttons to switch the sound off and on for the speaker and
microphone, respectively.
When using Half-du
plex mode this button toggles between allowing you to speak and listen.
The first icon indicates that you can talk and the speaker attached to
the camera will play your
voice. The second indicates that you will hear audio from the camera, but no audio will be sent
to web clients. When in Simplex talk mode, the icon toggles between allowing you to speak and
is dimmed when you do not want other clients to receive any audio.