


5
AXIS 213 PTZ
Product Description
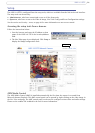
The AXIS 213 PTZ Network Camera is a fully featured PTZ network camera for security surveillance and
remote monitoring. The images from the camera are made available on the network as real-time, full frame
rate Motion JPEG streams and/or MPEG-4 video streams. The AXIS 213 also has an infrared (IR) lamp and
a removable IR filter for day and night operation.
The AXIS 213 PTZ can optionally be equipped with a connection module that provides 2 inputs and 3
outputs, which can be connected to external devices, e.g. door sensors. The connection module also
provides Audio IN/OUT connections, thus providing support for 2-way audio. For more information on the
connection module see
page 35.
Video can be viewed in 5 resolutions (up to 768x576). Up to 20 viewers can access the AXIS 213 PTZ
simultaneously when using Motion JPEG and MPEG-4 unicast. The number of simultaneous viewers can be
increased by using multicast MPEG-4.
The AXIS 213 PTZ contains advanced scheduling tools that can be used to trigger an event. As the AXIS
213 PTZ is designed for use in security systems, it is equipped with security features such as IP address
filtering and multilevel passwords. The AXIS 213 PTZ has a built-in Web server, providing full access to all
features through the use of a standard Web browser.
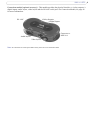
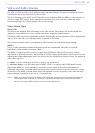
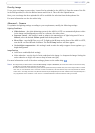
AXIS 213 PTZ Network Camera
1
1
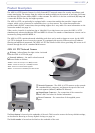
2
IR lamp - infrared lamp for night vision. Activated
from the AXIS 213 PTZ web page.
2
Network indicator - the multi-colored network
indicator flashes as follows:
•Amber - flashes for activity on a 10 Mbit/s network
•Green - flashes for activity on a 100 Mbit/s network
•Red - flashes for a failed firmware upgrade
•None - no connection or disabled by the administrator
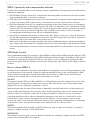
3
4
5
3
Network Connector - The AXIS 213 PTZ connects to the network
via a standard RJ-45 connector, and detects the speed of the local
network segment (10BaseT/100BaseTX Ethernet).
4
Output/Input Connector - For connection of the connection
module cable. See below for further information.
5
Power Connector - For connection of the supplied power
adapter.
The Reset button is located on the underside of the unit. This is used to restore the factory default settings,
as described in
Resetting to Factory Default Settings, on page 34.
The Serial number is located on the label on the underside of the unit.