


42 en | Configuring and Using the IP AutoDome AutoDome Modular Camera System
F01U064036 | 1.0 | 2007.01 VG4-200, VG4-300, VG4-500i Series User’s Manual Bosch Security Systems, Inc.
8.4.1 Installing the Required Software
To view live video, you must install Bosch MPEG ActiveX, DirectX, and Java Virtual Machine.
To install the software:
1. Insert the IP AutoDome software CD into the CD-ROM drive of the computer.
2. Click the Windows Start button, select Run, and then Browse to the CD drive.
3. Open the Install folder, then open the MPEG_ActiveX folder, and double-click the MPE-
GAx.exe file. Follow the on-screen instructions to install the Bosch MPEG ActiveX.
4. Open the Tools folder, then open the DirectX9 folder, then open the DirectX9.0c
folder, and double-click on the dxsetup.exe file. Follow the on-screen instructions to
install DirectX.
5. Open the Tools folder, then open the Java VM folder and double-click the executable file.
Follow the on-screen instructions to install Java.
8.4.2 Changing the Network Settings
The IP Module has a default IP address of 192.168.0.1. To change the IP address or any net-
work settings, you can use the Configuration Manager software supplied on the CD or the
AutoDome IP Web Server.
Using Configuration Manager
Configuration Manager is an optional network utility provided on the AutoDome CD. To install
the Configuration Manager software:
1. Browse to the CD and double click on the executable file. Follow the on-screen instruc-
tions to install Configuration Manager and .NET Framework if required.
2. Use the Configuration Manager Manual provided in the Documentation folder on the CD to
make any configuration changes.
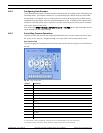
Using the AutoDome IP Web Server
The IP AutoDome incorporates a network video server in the IP module.
To configure the camera using the AutoDome IP web server:
1. Set the IP address on the PC to 192.168.0.10 to ensure that the PC and the IP
AutoDome are on the same Subnet.
2. Launch Microsoft Internet Explorer and navigate to the following URL:
http://192.168.0.1.
The Web browser opens the Livepage for the IP AutoDome and you receive a security
warning message.
3. Check the Always Trust box; then select YES.
4. Click the Settings link, located at the top of the Livepage.
5. Click the Service Settings link, located in the left pane of the Settings page.
i
NOTICE! Contact your local network administrator for a valid IP address, Subnet Mask, and a
Gateway IP Address.
i
NOTICE! Depending on the PC network security settings, the user may have to add the new IP
address to the browser’s trusted sites list for the browser controls to operate.