


33
Preparing the Camcorder
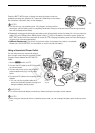
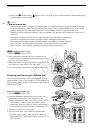
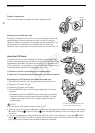
# Attaching an EF Lens
1 Set the Q switch to OFF.
2 Remove the body cap from the camcorder and any
dust caps from the lens.
3 Attach the lens to the camcorder and turn the lens
in the direction of the arrow until it clicks in place.
• EF lenses: Align the red mark on the lens with the
red EF Lens mount index mark on the camcorder.
• EF-S lenses: Align the white mark on the lens with
the white EF-S Lens mount index mark on the
camcorder.
NOTES
• Turning on the image stabilization function of an EF
lens may reduce the effective usage time of the
battery pack. When image stabilization is not
necessary, for example if the camcorder is fixed to a tripod, it is recommended to turn it off.
• Depending on the lens used, you may experience one or more of the following limitations.
- The lens model name may be shortened when displayed on the screen.
- You may not be able to focus manually when the focus mode switch is set to AF.
- You may not be able to use the focus preset function (super telephoto lenses).
- You may not be able to use the power zoom function of the lens.
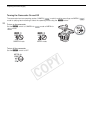
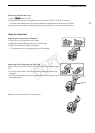
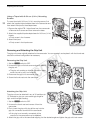
# Removing an EF Lens
1 Set the Q switch to OFF.
2 Hold down the lens release button and turn the lens all the
way in the direction of the arrow until it stops.
3 Remove the lens and replace the body cap to the
camcorder and the dust cap to the lens.
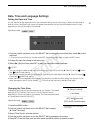
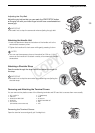
# Peripheral Illumination Correction
Depending on the characteristics of the lens used, the image
around the corners of the picture may seem darker due to light
fall-off or peripheral illumination drop. If the camcorder has
correction data available for the EF lens used, it can apply this
correction data to compensate as necessary.
1 Attach the lens you want to use.
2 Open the peripheral illumination correction screen.
[~ Camera Setup] > [Periph. Illum. Corr.]
• If correction data is available, the lens model name will appear on the
screen.
• If correction data is not available, [Periph. Illum. Corr.] will appear
grayed out. Visit your local Canon Web site and check if there is
correction data available for the lens you are using. If so, download the necessary update package and
upgrade the camcorder’s firmware following the instructions supplied therein.
3 Select [On] and then press SET.
Operating modes:
[~ Camera Setup]
[Periph. Illum. Corr.]
[Off]
COPY