


Preparing the Camcorder
34
•As long as [~ Camera Setup] > [Periph. Illum. Corr.] is set to [On], the camcorder will automatically apply
the appropriate correction data.
NOTES
• About lens correction data:
- The camcorder contains a register of correction data for compatible lenses that were available at the time
the camcorder went on sale. Correction data for future lenses will be made available as part of the regular
updates released for the camcorder’s firmware. For more details, visit your local Canon Web site.
- Depending on the recording conditions, noise may appear in the periphery of the image as a result of the
correction.
- The level of correction will be lower for lenses that cannot provide distance information.
- The level of correction will be lower the higher the ISO speed/gain setting used.
- No correction will be applied when correction data is not available for the lens attached.
- When using EF-S lenses, peripheral illumination fall-off may be more pronounced.
- When using non-Canon lenses, peripheral illumination will not be corrected.
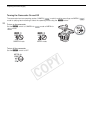
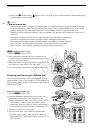
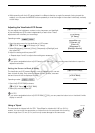
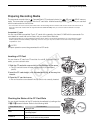
$ Attaching a PL Lens
1Set the Q switch to OFF.
2 Hold a bayonet ring handle and turn the bayonet ring
counter-clockwise to remove the body cap and remove
any dust caps from the lens.
3 Attach the lens to the camcorder aligning a groove on the
lens with the PL lens index pin on the mount.
4 Turn the bayonet ring clockwise to fix the lens in place.
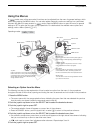
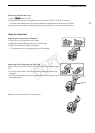
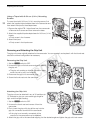
Attaching and Removing the Monitor Unit
You can attach the monitor unit to the accessory shoe on
the camcorder or that on the handle unit. Further ahead you
will find details about using the LCD panel and adjusting the
LCD screen (A 36).
Attaching the Monitor Unit
1Set the Q switch to OFF.
2 Insert the attachment base of the monitor unit to the
camcorder’s or the handle unit’s accessory shoe.
• Use the attachment base at the bottom of the monitor
unit to attach it directly to the camcorder. Use the
attachment base at the back of monitor unit to attach it
to the accessory shoe on the front of the handle unit.
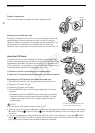
3 Tighten the monitor unit’s lock screw.
4 Connect the monitor unit’s cables to the camcorder.
• Connect cable number 1 (with the white line) to the
camcorder’s EXT 1 terminal and cable number 2 to the
EXT 2 terminal.
COPY