


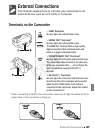
External Connections 135
Saving Movies (Windows only)
With the supplied software Transfer Utility or VideoBrowser you can
save to your computer the scenes you have recorded. Additionally, the
supplied software VideoBrowser offers many options for organizing
your video library, editing video, creating discs and more.
Installation
Install the software before you connect the camcorder to the computer
for the first time. Refer to the Installation Guide (supplied leaflet) and
follow the instructions in the Software Guide (PDF file) to install the
supplied PIXELA’s software.
Connecting the Camcorder to a Computer
1 Power the camcorder using the compact power adapter.
If the camcorder is connected to the computer while it is powered only
by the battery pack, previously saved video files cannot be transferred
back to the camcorder and music files cannot be transferred from the
supplied Camcorder Supplemental Disc to a memory card in the
camcorder.
2 Open the index screen that contains the scenes you want to save.
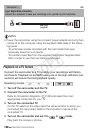
3 Connect the camcorder to the computer using the supplied USB
cable.
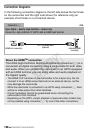
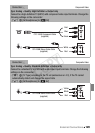
Connection D. Refer to Connection Diagrams (0 130).
4 Computer: Depending on the software you chose to install,
Transfer Utility or VideoBrowser will start up automatically.
• Transfer Utility: Click [Video file import] to start transferring files. For
details about using the software, click [Help] to open the Software
Guide (PDF file).
• VideoBrowser: Click in the menu panel to start transferring files.
For details about using the software, click to open the
Software Guide (PDF file).
COPY