


1
23
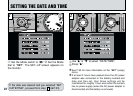
Use the “dc” button to select the desired item
and then use the “a” and “b” buttons to correct
the setting.
When you have finished setting the date and
time, press the “MENU/OK” button to confirm the
setting.
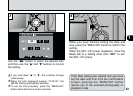
When the SET–UP screen reappears, move the
Mode dial to a setting other than “
`” to exit
the SET–UP screen.
●
!
If you hold down “a” or “b”, the numbers change
continuously.
●
!
When the time displayed passes “12:00:00”, the
AM/PM setting automatically switches.
●
!
To set the time precisely, press the “MENU/OK”
button when the time is at zero seconds.
443
If the date setting was cleared and you have
set the date and time from the confirmation
screen, pressing the
“
MENU/OK” button
returns you to the selected photography or
playback mode.