


37
3
c
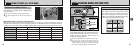
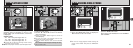
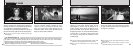
FLASH
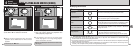
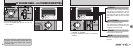
PHOTOGRAPHY MENU
Use the flash mode that best suits your shot.
h5 modes: “AUTO”, “
n”, “c”, “b” and “v”
hEffective flash range (in “A AUTO” mode):
Approx. 0.8 m to 3 m (2.6 ft. to 9.8 ft.)
●
!
If you use the flash in very dusty conditions or when it
is snowing, white dots may appear in the image due to
the flash reflecting off the dust particles or snowflakes.
Try taking the shot with the flash switched off.
●
!
The flash charging time may increase if the charge
remaining in the batteries is low.
●
!
When you take a shot using the flash, you may see
the video image disappear and the screen go dark
as the flash charges. The viewfinder lamp flashes
orange while the flash is charging.
●
!
You cannot use this setting in Macro (close-up)
photography.
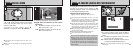
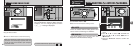
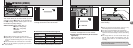
Use this mode for ordinary photography. The
flash fires automatically as required by the
shooting conditions.
AUTO
Auto Flash Mode
36
y
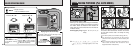
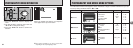
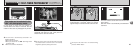
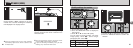
SETTING THE QUALITY
PHOTOGRAPHY MENU
✽ Displaying the menus (➡P.34)
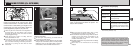
●
!
The numbers to the right of each setting show the
number of available shots.
●
!
When you change the quality, the number of
available shots also changes.
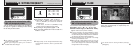
You can choose from 4 settings. Use the table on
the right as a guide for selecting the best setting
for the shot you want to take.
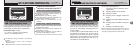
<Examples>
hFor printing on A5 paper → 2M
•
F, 2M
•
N
✽ Select “2M
•
F” (FINE) for better image quality and
“2M
•
N” (NORMAL) to increase the number of
available shots.
In most cases, the “2M
•
N” (NORMAL) setting
provides more than adequate image quality.
hFor printing on A6 (postcard) paper → 1M
hFor an image attached to E-mail or used on a
website → 0.3M
Printing
Internet
Quality
2M
•
F (1600 × 1200)
2M
•
N (1600 × 1200)
1M (1280 × 960)
0.3M ( 640 × 480)
Use
This mode can be selected in the “
A
”,
“
S
” still photography modes.
This mode can be selected in the “
A
”,
“
S
” still photography modes.
✽ Displaying the menus (➡P.34)
●
!
Image quality can be changed afterwards using
FinePixViewer software, which is provided with
camera.