


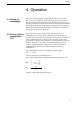

4. Operation
4.6 Basic
operating
procedure -
AU
4.7 Basic
operating
procedure -
Transmission
(%T)
4.8 Shut down
1.
2.
3.
4.
1.
2.
3.
4.
5.
6.
7.
1.
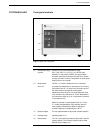
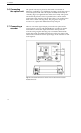
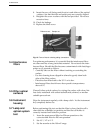
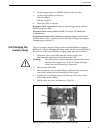
Switch AU/ %T to AU (Fig. 5:13).
Set the range selector (Fig. 5:12) to SHORT and zero the
recorder with the recorder zero control.
Set the range selector to 2 and adjust the recorder baseline with
the baseline adjust (Fig. 5:14).
Set the range selector to the appropriate range and readjust the
recorder baseline with the baseline adjust (Fig. 5:14). Only
minor adjustment should be necessary.
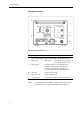
Switch AU to %T (Fig. 5:13).
Set the range selector (Fig. 5:12) to SHORT and zero the
recorder.
Turn the baseline adjust (Fig. 5:14) fully clockwise.
Set the range selector so that the recorder gives a deflection just
greater than 100%.
Adjust baseline to bring the pen back to 100%.
Exchange the converter for the shutter and zero the recorder
with the recorder zero. This response will correspond to 0%
transmission.
Replace the shutter with the converter. This response will
correspond to 100% transmission. Slight adjustment of baseline
may be required to obtain the response obtained in Step 5.
On completion of the chromatographic run, flush the flow cell
either with pure solvent or the buffer used in the
chromatographic run. To prevent the deposition of salts from
aqueous buffers, flush the cell with distilled water after use, if
necessary after disconnecting the column.
Note:
Never allow aqueous buffers to dry out in the cell. Either
continue to flush through with buffer or leave the cell filled
with distilled water.
2.
Leave the UV-1 switched on. The monitor should only be
switched off if it is not going to be used again for more than one
week.
17