


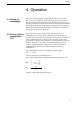
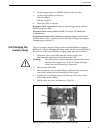

8. Insert the new cell, being careful not to touch either of the optical
surfaces. See that the inlet and outlet ports are correctly aligned.
9. Retighten the screw washers with the tool provided. Do not use
excessive force.
10. Check for leakage.
11. Replace the black cover.
For optimum performance, it is essential that the interference filters
are clean and free of any particulate material. Do not touch the inter-
ference filters. Should the filter become contaminated with dust,finger
prints or oil, proceed as follows:
- Carefully take out the filter without touching or scratching the
surface.
- Use lens cleaning tissue dipped in ethanol to gently clean both
sides of the filter surface.
- Place the clean filter back to the UV-1 or its box.
- Interference filters should never be exposed to temperatures
above 60 °C
Clean all other optical surfaces by wiping the surface with clean, lint-
free cloth, moistened with carbon tetrachloride, ethanol, or another
suitable pure solvent.
Wipe the instrument regularly with a damp cloth. Let the instrument
dry completely before use.
Before performing this test see that the filter is clean, that the cell is
clean and free of bubbles or particles and that the cell holder is
correctly inserted and locked in position.
1. Insert the aperture and filter for 254 nm operation or the
converter and filter for 280 nm operation.
2. Set AU / %T to % T.
3. Set the recorder to the 100 mV range.
20
5. Maintenance
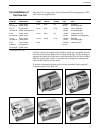
Reference out
Sample out
Reference in
Sample in
5.4 Interference
filters
5.5 Other optical
surfaces
5.6 Instrument
housing
5.7 Lamp and
optical system
test
Fig. 13.
Flow cell interior showing tubing connections.