


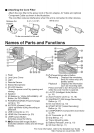


[] AttachingtheCoreFilter
Attachthecorefiltertothepower cord of the AC adapter, AV Cable and optiona(
Component Cable as shown in the illustration.
The core filter reduces interference when this unit is connected to other devices.
Release the 3 cm (1-3/16") Wind once
stopper, i_
To be connected to this unit
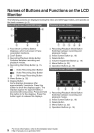
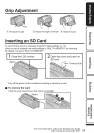
Names of Parts and Functions
®
@
Flash
2_ Lens/Lens Cover
(3_Light
(4_Remote Sensor
_5_Stereo Microphone
_6_3D LCD Monitor
Turns the power on/off by opening and
closing.
q> Speaker
(8_3D Button (p. 19)(for GZ-HM960) / AF
Button (for GZ-HM860)
(9_POWER/CHARGE (Power/Charge)
Lamp (p. 10)
@ ACCESS (Access) Lamp
Lights up/blinks during recording or
playback.
@ USB Connector (p. 31)
@ HDMI Mini Connector (p. 20)
@ USER (User) Button
Activates preset functions.
@ mlt/l_ (Video/Still Image) Button
Switches between video and still image
modes.
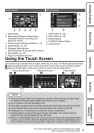
(i5>_ (Power/Information) Button
Recording : Displays the remaining
time (for video only) and
battery power.
Playback : Displays file information
such as recording date.
Press and hold to turn the power on/off
while the LCD monitor is opened.
_ i.AUTO (Intelligent Auto) Button
(p. 15)
@ Zoom/Volume Lever (p. 15, 18)
_8>SNAPSHOT (Still Image Recording)
Button (p. 17)
@ DC Connector (p. 10)
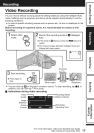
@ START/STOP (Video Recording)
Button (p. 15)
@ COMPONENT (Component) Connector
(p. 20)
@ AV Connector (p. 21,26)
@ Grip Belt (p. 11)
@ Tripod Mounting Hole
@ Battery Release Lever (p. 10)
@ SD Card Slot (p. 11)
For more information, refer to the Detailed User Guide
http://manual.jvc.co.jp/index.html/ '7