


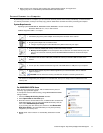

12 Customer Support: http://www.pandigital.net/kodaksupport
Scanning Mounted Slides
1. Make sure that the transparency feed slot is clear of any original and there is enough space behind the scanner for the slide
holder to completely feed through the unit.
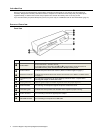
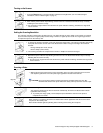
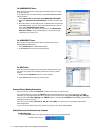
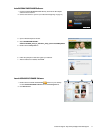
2. Open the slide holder, place the mounted
slide in the holder as shown, and then close
the holder.
Pay attention to the direction of the mounted slide
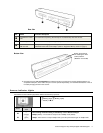
3. Insert the slide holder level into the transparency feed slot. The original is fed into the slot and
scanned automatically.
The scanner scans transparencies at a higher resolution; therefore the scanning speed is slower
than that of photo scanning. This is not a malfunction.
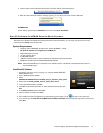
When scanning is completed, the Power and Status/Card indicator lights blink while the scanner stores
the photo on the memory card.
Wait until the indicator lights stop blinking before inserting and scanning the next original.
CAUTION: Insert only one original at a time, and insert the next original only when the previous one is done. Otherwise
the scanner may malfunction.
Do not remove the memory card or disconnect the power supply or batteries while the indicators are blinking.
Please do not insert a photo into the Photo feed slot while scanning a slide.
Please remove the slide from the slide holder when scanning is done.
This scanner produces JPEG (.jpg) file formats. The date/ time attribute are not added.
If the memory card is nearly full (less than 10 MB remaining), the Status/Card indicator blinks (refer to “Indicator Lights” on
page 5). Use another card or transfer pictures to your computer.
To turn off the scanner, press and hold the power button for one second. The power indicator blinks
and then goes off.
Now you can safely disconnect the power and remove the memory card from the scanner.
The scanner automatically turns off if it’s left idle for 5 minutes. (If it’s connected to a computer, the
scanner does not automatically turn off.)
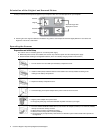
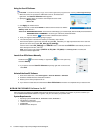
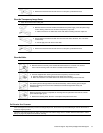
Automatic Image Cropping
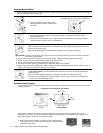
The scanner has a built-in cropping function that detects and crops dark edges of an original during the scan process (see
following illustration).
Cropping size (as measured on the original)
Use the plastic sheath when scanning originals that are sized or shaped other than the standard 3.5”x5” or 4”x6”.
Depending on the shape, you may want to perform additional manual cropping on the scanned image, using your own
photo editing software, to achieve your desired final image.
When scanning darker originals (for example, a photo of the night sky),
over-cropping may occur. Please insert the original in a different direction
(orientation) and try again.
Original
Scanned image
Max. 1.5mm
Max. 1.5mm
Max.
1.5mm
Max.
1.5mm