


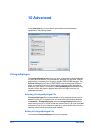


Advanced
1
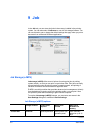
In Advanced > Prologue/Epilogue, select a Prologue/Epilogue file name
from the list, and then click Edit.
2
After your text editor opens, make your changes to the file.
3
Save the file and exit.
Note: Editing and saving a command file replaces the contents of the existing
local or network file.
Deleting a Prologue/Epilogue File
You can remove a Prologue/Epilogue file from the list.
1
In Advanced > Prologue/Epilogue, select a Prologue/Epilogue file name
from the list, and then click Delete.
2
In the delete confirmation box, click Yes to accept.
Note: Only the file name is removed from the command file list. The file itself
is not deleted, but remains on the network or local computer.
Assigning a Prologue/Epilogue File
You can insert a Prologue/Epilogue file into a print job.
1
In Advanced > Prologue/Epilogue, select a Prologue/Epilogue file name
from the list.
2
Under Insertion Point, select a place to insert the Prologue/Epilogue file.
Unassigning a Prologue/Epilogue File
If you designate a Prologue/Epilogue file as unassigned, you are removing it
from the print job. It remains in the list. Unassigned selections are useful when
the list contains several Prologue/Epilogue files, and you want to use some but
not others.
1
In Advanced > Prologue/Epilogue, select a Prologue/Epilogue file name
from the list.
2
Under Insertion Point, select Unassigned.
Specifying the Insertion Point
The insertion point is the location in the print job where the selected
Prologue/Epilogue command file is processed by the printing system. Each file
in the list can be assigned only one insertion point.
Note: The Start of the page and End of the page insertion point options are
available only if PCL 5c is selected in the PDL Settings dialog box.
With a command file selected in the list, choose one insertion point option:
KX DRIVER
10-2