


- 21 -
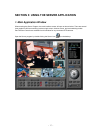
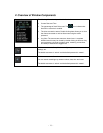
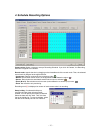
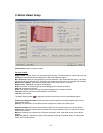
• Display character on screen: Displays the information associated with each camera on screen.
*OSD (On Screen Display) menu:
Camera location: camera name set in Camera setup panel
Record mode set: Continuous record(
), Motion record( ), Sensor record( ), Event record( )
Motion: Detect (
)
Sensor: Detect (
)
Audio set: Enable (
)
Recording: in recording (R)
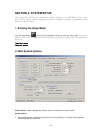
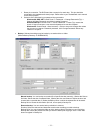
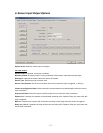
• HDD Overwrite: Enable the HDD to overwrite when full. If disabled, recording will stop when the HDD is
full.
• Record drive: Setup the drive used for recording.
• PTZ Port number: Select the COM Port that the PTZ camera will be connected to.
• Product Number: The Product Number is the unique number given to each DVR product.
• IP Address: Shows the IP address of the computer running the server program.
(Static IP address / Dynamic IP address / PPPoE IP address)
The DVR Client and Search can connect to the DVR Server remotely using ‘Server IP‘ or ‘Product
number’.
If you use the Internet with Dynamic IP address, you should connect by using Product number,
because the Dynamic IP address may change frequently.
• Audio recording and transferring: Enable/Disable. If enabled, you can record the Server’s audio signal
(from the audio cable connected to DVR card of this computer) at the server. This audio may also be
transferred to the computer running the DVR Client.
Audio inputs are associated to video channels in numerical order. (ex. Audio1/Channel1)
The Audio icon ( ) will be displayed on the screen of the selected channel.
In search mode, a white-line on the timetable indicates an audio file is recorded.
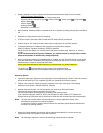
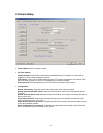
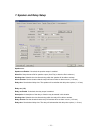
Advanced Options:
• Input video signal type: Setup the video signal type of connected cameras. (NTSC or PAL) All cameras
should be the same type. This is applied only after you restart the DVR Server program.
• Capture video resolution: Setup the capture resolution of the input video signal. The following
resolutions are available - 640x480, 640x240, 320x240
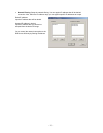
• Network video port number: You can change the port number by clicking this button.
Input the new network video port number and click ‘OK’.
The new port-numbers will be applied by re-starting DVR Server program.
If you input the video port number to ‘2000’, Port Numbers for Video, Audio, P/T/Z camera and
Remote Search of DVR Server will be each fixed to 2000 and 2001 and 2002 and 2003 automatically.
Notes: The video port number (2000) must be entered in the server registration section of the
Client/Search programs on the remote computer.
In case that a Firewall is installed, these Ports must be opened to permit Remote Search/Client
connection via external network.
• Watch-dog: When enabled, the computer will be rebooted automatically if it did not receive any
response from the DVR system for more than 5 minutes.
Notes: The following is required in order for the watch-dog re-boot function to operate.