


59
Connecting to Televisions, Computers, and Printers
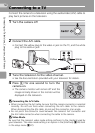
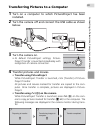
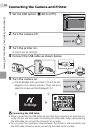
Connecting to a Computer
Use the USB cable to connect the camera to a computer, and copy
(transfer) pictures to a computer with the supplied PictureProject soft-
ware.
Before Connecting the Camera
Installing PictureProject
Before transferring pictures or movies to a computer, PictureProject
must be installed. For more information on installing and using Picture-
Project, see the Quick Start Guide.
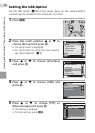
Confirming USB Option
The following two methods can be used to transfer pictures from the
camera to a computer:
•Press E (d) on the camera.
• Click [Transfer] in PictureProject.
The method used will depend on your computer’s operating system
and the USB option selected in the camera’s setup menu.
1
Refer to the Nikon website for the latest information on operating system com-
patibility.
2
This camera supports the USB options, [Mass storage] and [PTP] (default set-
ting).
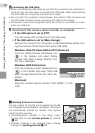
3
The camera’s E (d) button cannot be used to transfer pictures when the
memory card write-protect switch is in the “lock” position. Use [Transfer] in
PictureProject. To use E (d) on the camera, unlock by sliding the switch to
the “write” position before transferring pictures.
4
If your computer is running Windows 2000 Professional, be sure to set the USB
option to [Mass storage]. If [PTP] is selected, the Found New Hardware Wizard
will be displayed when the camera is connected to the computer. Select [Can-
cel], close the window, and disconnect the camera from the computer.
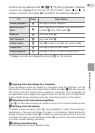
Operating system
1
USB option
2
E (d) on
the camera
3
[Transfer] in
PictureProject
Windows Vista (32-bit Home-
Basic/HomePremium/Business/
Enterprise/Ultimate editions)
Choose
[Mass storage].
Choose [Mass storage]
or [PTP].
Windows XP Home Edition
Windows XP Professional
Choose [Mass storage] or [PTP].
Windows 2000 Professional
4
Choose [Mass storage].
Mac OS X (10.3.9, 10.4.x)
Choose [PTP].
Choose [Mass storage]
or [PTP].