


75
EN
6
Flash shooting
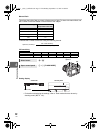
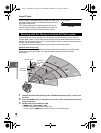
Functions available with external flash units
* The focal length of the lens that can be used (Calculated based on 35 mm film camera)
x Notes
• The FL-40 optional flash cannot be used.
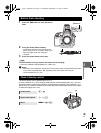
Using the external electronic flash
Be sure to attach the flash to the camera before turning on the flash’s power.
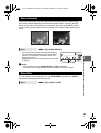
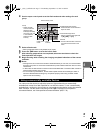
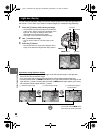
1 Remove the hot shoe cover by sliding it
in the direction indicated by the arrow in
the illustration.
• Keep the shoe cover in a safe place to avoid
losing it, and put it back on the camera after
flash shooting.
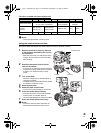
2 Attach the electronic flash to the hot
shoe on the camera.
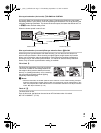
• If the lock pin is protruding, turn the shoe lock
ring as far as it will go in the direction opposite
to LOCK. This will pull the lock pin back
inside.
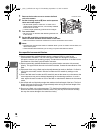
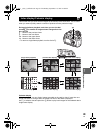
3 Turn on the flash.
• When the charge lamp on the flash lights up,
charging is complete.
• The flash will be synchronized with the camera
at a speed of 1/250 sec. or less.
4 Select a flash mode.
5 Select the flash control mode.
• TTL-AUTO is recommended for normal use.
6 Press the shutter button halfway.
• Shooting information such as ISO sensitivity,
aperture value, and shutter speed is
communicated between the camera and flash.
7 Press the shutter button all the way.
x Notes
• The built-in flash cannot be used when an
external flash is attached to the hot shoe.
Optional flash
FL-50R FL-50 FL-36R FL-36 FL-20 RF-11 TF-22
Flash control mode
TTL-AUTO, AUTO, MANUAL,
FP TTL AUTO, FP MANUAL
TTL-AUTO,
AUTO, MANUAL
TTL-AUTO,
MANUAL
GN (Guide
number)
(ISO100)
GN50 (85 mm
*
)
GN28 (24 mm
*
)
GN36 (85 mm
*
)
GN20 (24 mm
*
)
GN20 (35 mm
*
)GN11 GN22
RC mode 9 k 9 kkkk
Hot shoe cover
Lock pin Lock ring
s0011_e_00_0_unified.book Page 75 Wednesday, September 12, 2007 4:46 PM