


48
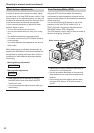
During shooting, you can record up to two
channels of sound. You can also switch the input
sound to be recorded on each of the channels to
the built-in microphones, external microphones or
audio equipment connected to camera.
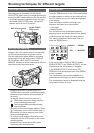
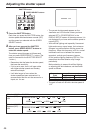
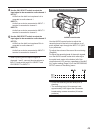
BARS
LCD
ZEBRA OIS
EVF DTL WFM
CH1 SELECT CH2 SELECT
INPUT 1 INPUT 2
SHUTTER
COUNTER
RESET/TC SET
AUDIO
SPEED SELECT
INT(L)
INPUT1
INPUT2
INT(R)
INPUT2
ON
MIC POWER +48V
OFF
ON
OFF
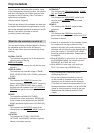
CH2 SELECT switch
CH1 SELECT switch
INPUT 1/2
(MIC POWER +48V)
switches
INPUT 2 switch
INPUT 1 switch
INPUT 1 terminal
INPUT 2 terminal
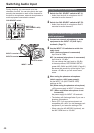
Switching Audio Input
Using the built-in microphone
1
Switch the CH1 SELECT switch to INT (L).
Audio from the built-in microphone Lch is
recorded to audio channel 1.
2
Switch the CH2 SELECT switch to INT (R).
Audio from the built-in microphone Rch is
recorded to audio channel 2.
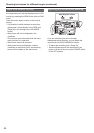
Using an external microphone and
audio equipment
1
Connect an external microphone or audio
equipment to the INPUT 1/2 (XLR 3-pin)
terminals. (Page 71)
2
Use the INPUT 1/2 switches to switch the
audio input.
LINE: (audio equipment is connected)
Input level is 0 dBu.
MIC: (an external microphone is connected)
Input level is –50 dBu.
You can change the input level to
–
60 dBu
in the setup menus, RECORDING SETUP
screen MIC GAIN1 and MIC GAIN2. (Page 91)
Be aware that sensitivity will be higher if you
choose –60 dBu so you will record more
noise.
3
When using the phantom microphone
(which requires + 48V power supply),
set the INPUT 1/2 (MIC POWER +48V)
switches to ON.
ON: (When using the phantom microphone)
+48V power supply to INPUT 1/2 terminals.
OFF: (When a phantom microphone is not
connected)
No power supply for INPUT 1/2 terminals.
The battery will discharge faster if you use a
phantom microphone.
Set to OFF if you connect equipment not
compatible with +48V. You can damage such
equipment if you leave the setting at ON.
When using the AG-MC200G (optional), set
the MIC GAIN item to –50 dBu.
•
•
•
•
•