


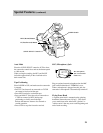


37
Playback on TV or VCR (continued)
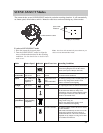
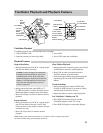
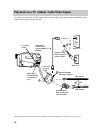
1. A.Camcorder connected directly to TV monitor:
Turn on the TV and tune it to the video input
channel.
B. Camcorder connected to VCR that is already
connected to TV: Turn on VCR and place it in
the “line” or “camera mode”. (If your VCR
does not have a “line” or “camera mode”,
consult the VCR owner’s manual.) Operate the
TV as you normally do to see the signal
coming from the VCR.
2. Place AV IN/OUT switch in OUT.
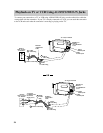
1. A.Camcorder connected directly to TV: Turn on
the TV, and tune it to the video input channel.
B. Camcorder connected to VCR that is already
connected to TV: Turn on VCR and place it in
the “line” or “camera mode”. (If your VCR
does not have a “line” or “camera mode”,
consult the VCR owner’s manual.) Operate
the TV as you normally do to see the signal
coming from the VCR.
2. Attach a power supply, and press and hold the
small button on the camcorder’s POWER switch
while you place it in CAM. Place ON/POWER
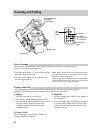
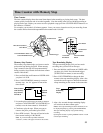
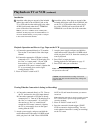
Installation
1 Attach the white plug on one end of the included
audio/video cable to the AUDIO IN jack on the
TV or VCR and the other white plug to the white
AUDIO jack located under the AV TERMINAL
cover on the side of the camcorder.
Note: If your TV or VCR has stereo AUDIO jacks,
attach the AUDIO plug to the one labeled MONO. If
one is not labeled MONO, you may need a Y-adapter
to hear sound from both channels.
2 Attach the yellow video plug on one end of the
included audio/video cable to the VIDEO IN jack
on the TV or VCR and the other yellow plug to
the yellow VIDEO jack located under the AV
TERMINAL cover on the side of the camcorder.
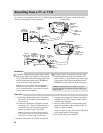
Playback Operation and How to Copy Tapes on the VCR
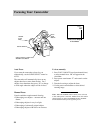
Viewing What the Camcorder is Seeing (or Recording)
3. Attach a power supply, and press and hold the
small button on the camcorder’s POWER switch
while you place it in VCR. Insert the cassette you
want to playback.
4. Press PLAY to begin playback.
During playback, use the features on page 35.
5. Press STOP when you are finished.
Notes: The corresponding buttons on the remote control
will operate the camcorder.
SAVE in ON, and insert the cassette you want to
record on.
Note: When the camcorder is used as a camera, turn the
TV’s volume down to prevent a high-pitched squeal
caused by feedback.
3. Place AV IN/OUT switch in OUT.
4. Press the camcorder’s thumb trigger (START/
STOP on remote) to begin recording. You can
watch what the camcorder is seeing (or recording)
on the TV screen.
Caution: The unauthorized recording of television
programs and other recorded material may infringe the
rights of others.