


4.4.1.1 Analog Camera Zooming
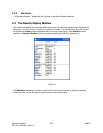
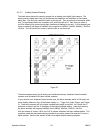
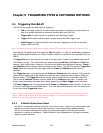
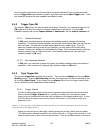
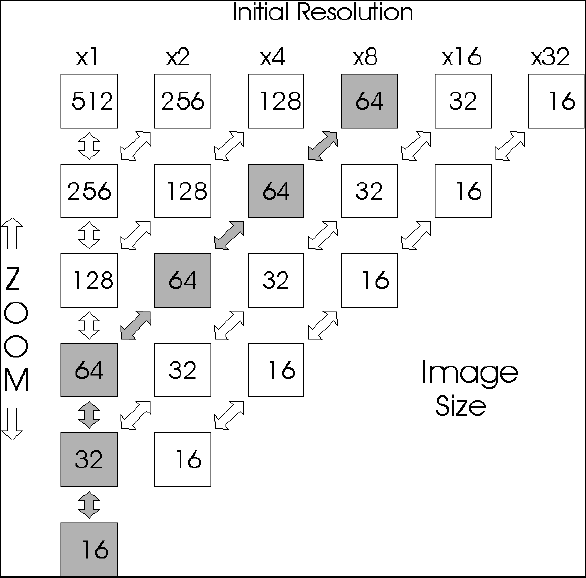
The chart below depicts the zooming process for an analog (non-digital) style camera. The
starting point is based upon how you configured the image size and resolution in the Camera
dialog box. First find your resolution factor in the top row. Then drop down to the display width
size. In the example below the resolution is x8, and the width is 64. Each time you zoom in
you’ll be following the arrows leaving each location and leading to the next. In this example your
zoom-in sequence will begin at 64x60x8, then progress to 64x60x4, 64x60x2, 64x60x1, 32x30x1,
16x15x1. You will retrace this route in reverse order as you zoom-out.
Figure 52
The above example works for all analog non-interlaced cameras, interlaced Interline transfer
cameras, and interlaced Full-Frame transfer cameras.
If your camera is an interlaced Frame transfer type, the above example works in CW mode, but
works slightly different in any of the Pulsed modes, i.e., Trigger Out, Video Trigger, and Trigger
In. These style cameras will only output a pulsed laser image in one field. As a result the x1
resolution is denied, and the x2 resolution is the highest possible setting. Under this scenario,
the above example will progress 64x60x8, then 64x60x4, 64x60x2, 32x30x2, 16x15x2.
With the release of version 4.00 a new Full 1x camera resolution has been made available. This
resolution makes the hardware zooming operate for an analog camera the same as if it were a
digital camera. See the next section to learn how digital camera zooming operates.
Operator’s Manual LBA-PC
112