


3.2.2.2 How to create a Drawn Aperture
You can create a Drawn aperture by using the Aperture dialog box, the Aperture toolbar, or by
dragging and dropping the aperture in the 2D display window.
Note: Before you can use the drag and drop method you must first select a Drawn aperture shape using either of
the first two methods.
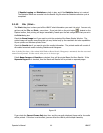
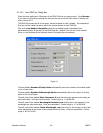
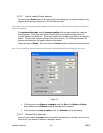
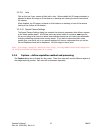
The Aperture dialog box, and the Aperture toolbar offer the same choices for creating a
Drawn aperture. The entries that define a Drawn aperture are listed vertically within the
recessed panel of the dialog box. These same entries are arranged horizontally on the aperture
toolbar. You can make the same changes from either location. The following discussion will
reference the dialog box, but applies equally to the toolbar.
Choose an aperture Shape. Enter the aperture’s Center location in X and Y coordinate values.
Note: You can modify any edit text control item by double-clicking inside the item and typing the new value.
Figure 13
• If the aperture is an ellipse or rectangle, enter the Size of the Major and Minor
axes, followed by the Rotation angle of the Major axis in degrees.
• If the aperture is a circle or square, enter the Diameter (not shown above).
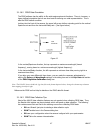
3.2.2.3 Drag and Drop Apertures
Once you have enabled a Drawn aperture from either the dialog box or toolbar, you can move,
resize, and (in the case of an ellipse or rectangle) rotate it.
Operator’s Manual LBA-PC
50