


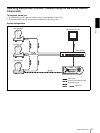
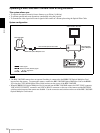
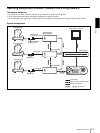

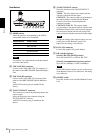
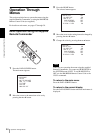

Overview
Location and Function of Parts
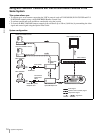
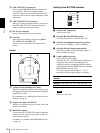
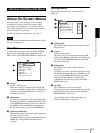
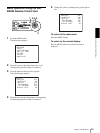
19
H RESET button
Hold down this button and press POSITION button
1 to 6, and the memory of the camera corresponding
to the pressed POSITION button is cleared to the
factory-preset conditions.
When multiple cameras are connected, hold down
this button and press the POWER button to set the
camera addresses.
I PRESET button
Hold down this button and press POSITION button
1 to 6, and the current camera settings are stored in
the memory of the camera corresponding to the
pressed POSITION button.
J PANEL LIGHT button
Press this button to illuminate all the POSITION
buttons and CAMERA buttons. Press the button
again to turn off the illumination.
K BACK LIGHT button
Press this button to enable the backlight
compensation function of the camera. Press it again
to disable the function.
L PAN-TILT RESET button
Press this button to reset the pan/tilt position of the
camera to the initial conditions.
M ONE PUSH AWB button
When ONE PUSH is selected with the WHITE
BALANCE menu of the camera, press this button
to perform the one-push white balance adjustment.
N MENU button
Press this button to display or turn off the menu of
the camera.
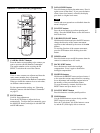
O Joystick
When the menu of the camera is not
displayed
The joystick is used for pan/tilt and zoom
operations.
When you incline the joystick right and left, the
camera pans.
When you incline it forward or backward, the
camera tilts.
The pan/tilt speed changes according to the angle of
the inclination.
When you release the joystick, the camera
movement stops.
When you turn the dial on the upper part of the
joystick clockwise, the subject becomes larger
(zoom in). When you turn it counterclockwise, the
subject becomes smaller (zoom out).
When you press the button on the top of the joystick
for one or two seconds with or without the menu
displayed, the pan/tilt/zoom are reset and the
camera returns to the front.
When the menu of the camera is displayed
The joystick is used for menu operations.
Inclining the joystick right, left, forward and
backward has the same function as pressing the
arrow buttons of the supplied Remote Commander.
Pressing the button on the top of the joystick has the
same function as pressing the HOME button on the
Remote Commander.
P SHIFT button and indicators
Press this button to select the function of the
POSITION buttons for positions 1 to 8 or positions
9 to 16.
The upper indicator lights for positions 1 to 8, and
the lower indicator for positions 9 to 16.
Q L/R DIRECTION button
Hold down this button and press POSITION button
2 (REV) to reverse the pan direction to the direction
in which you incline the joystick. To reset the
direction, hold down this button and press
POSITION button 1 (STD).
R POWER button
Press this button to light the CAMERA button(s)
corresponding to the status of the connected
camera(s).
Blue: The power of the camera is on.
Yellow green: The camera is in standby mode.
Off: No camera is connected.
Hold down this button and press CAMERA button
1 to 7 to turn on/off the power of the camera
corresponding to the pressed button.
S CAMERA buttons
Press one of the buttons to select the camera from
among those connected. The selected CAMERA
button lights in blue.
T POSITION buttons
You can store the various camera settings such as
the pan, tilt and zoom positions to the memory of
the camera corresponding to each POSITION
button, and load the settings in the memory.