


22
MZ-R501/R501PC
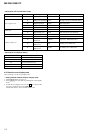
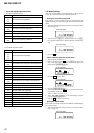
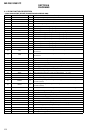
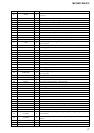
• Overall CD and MO adjustment items
1. Overall CD adjustment items
Item No. Description
312
313 CD electrical offset adjustment
314
321 CD tracking error gain adjustment
328 CD TWPP gain adjustment
324
CD tracking error offset adjustment
332
336 CD ABCD gain adjustment
344 CD focus gain adjustment
345 CD tracking gain adjustment
521
CD two-axis sensitivity adjustment
522
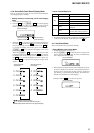
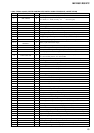
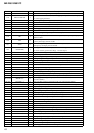
2. Overall MO adjustment items
Item No. Description
112
113
MO electrical offset adjustment
114
118
221 Low reflective CD tracking error gain adjustment
224
Low reflective CD tracking error offset adjustment
232
236 Low reflective CD ABCD level adjustment
244 Low reflective CD focus gain adjustment
245 Low reflective CD tracking gain adjustment
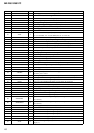
121 MO tracking error gain adjustment
122 MO TON offset adjustment
134 MO TWPP gain adjustment
131
MO double speed read TWPP offset adjustment
132
136 MO ABCD gain adjustment
144 MO focus gain adjustment
145 MO tracking gain adjustment
434 MO write TWPP gain adjustment
431 MO write TWPP offset adjustment
432 MO tracking error offset adjustment
436 MO write ABCD gain adjustment
445 MO write tracking gain adjustment
411 MO normal speed read TWPP offset adjustment
412 MO tracking error offset adjustment
448 20 sec full recording
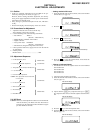
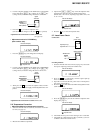
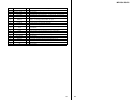
5-9. Mode Settings
After CD overall and MO overall adjustments are made, the fol-
lowing two modes should be set in the manual mode:
• Setting the auto time stamp mode
This mode is provided so that the auto time stamp (function that
delimits tracks at given intervals) can be turned on/off in the menu
mode.
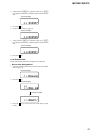
1. Select the manual mode of the test mode, and set item number
062 (see page 12).
2. Adjust with the [VOL+] key (adjusted value up) or [VOL--]
key (adjusted value down) so that the adjusted value becomes
S30.
3. Press the X key.
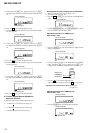
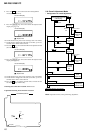
• Check method of auto time stamp mode
1. Turn the power off and then on.
2. Insert a disc and press the X key and [REC] key at the same
time. Verify that “REC” is flashing on the LCD display and
then push the [MENU/ENTER] key.
3. Press the
> key five times.
4. Press the [MENU/ENTER] key.
5. Verify that each time the > key is pressed, the LCD dis-
play changes as follows:
5min t 10min t 15min t off.
6. Verify that “OFF” is flashing on the LCD display and then
press the [MENU/ENTER] key.
7. Push the x key and remove the disc.
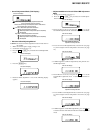
• Setting the ATRAC mode
This mode is provided to set the mode of ATRAC to TYPE-R (high
tone quality mode).
1. Select the manual mode of the test mode, and set item number
867 (see page 12).
This set LCD display
0 6 2 ***S20
This set LCD display
0 6 2 ***S30
This set LCD display
REC
u
00: 00EDIT
This set LCD display
REC
u
00: 00TimeMK
This set LCD display
8 6 7 ***S00