


D:\##SAGYO\DTP-shanhai-agari\824719S DCRTRV360-US\824719S DCR-TRV360_US\824719S DCR-
TRV360_US\3087921111 DCR-TRV360\01GB07DABB.fm
master:Right
DCR-TRV360/TRV361/TRV460
3-087-921-11(1)
Dubbing/Editing
87
Dubbing/Editing
Dubbing to another
tape
You can copy and edit the picture played
back on your camcorder to other recording
devices (such as VCRs).
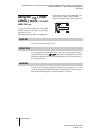
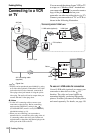
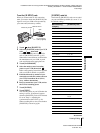
1 Connect your VCR to your camcorder
as a recording device (p. 86).
2 Prepare your VCR for recording.
• Insert a cassette for recording.
• If your VCR has an input selector, set it to
the input mode.
3 Prepare your camcorder for playback.
• Insert the recorded cassette.
• Slide the POWER switch to select the
PLAY/EDIT mode.
4 Start the playback on your camcorder,
and record it on the VCR.
Refer to the operating instructions supplied
with your VCR for details.
5 When the dubbing is finished, stop
your camcorder and the VCR.
b Notes
• When your camcorder is connected to the VCR via
the DV Interface, you cannot record the title,
indicators and words entered on the index screen of
the “Memory Stick.”
• When dubbing using the A/V connecting cable,
press DSPL/BATT INFO to hide indicators such as
time code (p. 54). Otherwise, they will be recorded
on the tape.
• To record the date/time and camera settings data,
have them displayed on screen (p. 54).
• Pictures edited with Picture effect ([PICT. EFFECT]
p. 68), Digital effect (p. 41, 48), or Playback zoom
(p. 53) cannot be output via the DV Interface.
• When connected using the i.LINK cable, the
recorded picture becomes rough when a picture is
paused on your camcorder while recording to a
VCR.
• For DCR-TRV460:
When you dub the tape recorded on other devices in
the Hi8 /standard 8 mm system via the
DV Interface, the picture may fluctuate. This is not a
malfunction. Digital signals are output as image
signals from the DV Interface during playback.