


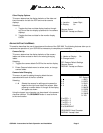


QSP-660: Instructions for Basic Operation and Installation
Page 13
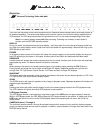
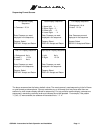
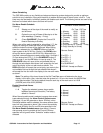
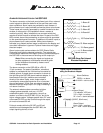
Set Alarm Enable Schedule
On Time Off Time
1: Monday 18:00 06:00
2: Tuesday 18:00 06:00
3: Wednesday 18:00 06:00
4: Thursday 18:00 06:00
5: Friday 18:00 06:00
6: Saturday 18:00 06:00
7: Sunday 18:00 06:00
8: Copy Monday to Tuesday – Friday
9: Copy Saturday to Sunday
Camera: Select
5 is VCR + 1
6 is VCR + 2
7 is VCR + 3
8 is VCR + 4
9 is QUADRANT
DISPLAY: Accept and Return
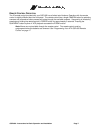
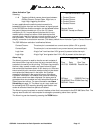
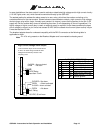
Enable Scheduled Alarms
1: Normal
2: Normal
3: Normal
4: Normal
Camera: Select
DISPLAY: Accept and Return
Alarm Scheduling
The QSP-660 contains a very flexible and advanced alarming system designed to provide an optimum
solution for any installation. Along with the ability to enable various types of alarm inputs, a built in 7-day
timer may also be used to individually enable and disable each alarm. The following menus are used to set
the timer and select which alarms the timer will control.
Set Alarm Enable Schedule
Selecting:
1
-
7
Selects one of the days of the week to modify on
and off times.
8
Copies the on and off times of Monday to all the
other weekdays (Tuesday – Friday).
9
(Press
QUADRANT
.) Copies the On and Off
times of Saturday to Sunday.
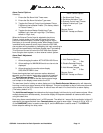
When a day of the week is selected for scheduling (1-7), the
display will change to reflect the time you are editing and
additional button functions will be displayed. When editing
times for a selected day, the
FREEZE
button will set the
alarm system to be On All Day. Similarly, the
ZOOM
button
will set the alarm system to be Off All Day. When editing a
time field, camera buttons are used to enter digits 1 through 4
(5-8 are entered as VCR +1-4), the
QUADRANT
button is
used to enter 9, and the
PIP
button is used to enter 0. The
SEQUENCE
button will move to the next editable field up
through the last editable field where it will accept the line and
return the display to the non-edit mode as shown. The
DISPLAY
button will accept the current entry and move to the
next editable field up through the last editable field where it
will accept the line and return the display to the non-edit mode
as shown.
Note:
The setting of the hours format in the Set Time/Date menu will determine the hours
display in this menu. Also, note that when the system is in 12-hour time mode, the AM/PM field
must also be edited. The factory default times for each day of the week are on at 18:00
(6:00PM) and off at 06:00 (6:00AM).
Enable Scheduled Alarms
Selecting:
1
-
4
Toggles the selected camera alarm enable
between Normal and Schedule. (The factory
default is “Normal”.
When Normal enable mode is selected, camera alarm event
types selected through the
Alarm Control Options menu
(see page 14) and will generate an alarm. Similarly, when
Scheduled enable mode is selected, the same camera alarm
event will only generate an alarm if the current time and day
of the week fall within the On and Off times specified in the
Set Alarm Enable Schedule menu
(see above). Camera
alarm events occurring outside of the On and Off times
specified will be ignored when “Schedule” enable mode is
selected.