


32
AXIS Camera Station - Event Configuration Wizard
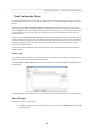
Event Configuration Wizard
Event Configuration Wizard helps you set up rules for triggers and actions in AXIS Camera Station. By setting up a rule you
can design actions to events; for instance when motion is detected, a siren will sound and recording will begin on designated
cameras.
Triggers are classified as M
otion
detection, Input/Output and System event. A Motion detection trigger is when an Axis
camera detects motion within its defined area. Detection is performed by the camera which means no processing load to the
server. Input/Output is when a camera's I/O port receives a signal from an external device, such as a doorbell, smoke detector
or switch. A System event occurs when connection to a camera is lost, access to the recording disk is denied or when the
recording disk is full.
Actions are classified as Re
cord, Ra
ise alarm, Set Output, Send e-mail and Live view. Record starts a recording with a defined
recording profile. Raise alarm sends an alarm, including an uploaded alarm procedure, to all connected clients. Set Output sets
the state of an output port and can be used to control an external device connected to the port. Send e-mail sends an e-mail,
with attached snapshots, to one or more recipients. The Live view action brings all clients to front and opens a specified
camera view or PTZ preset position.
I/O ports must be added to AXIS Camera Station before being used in t
he Event Conf
iguration Wizard. See Add Inputs and
Outputs, on page 29.
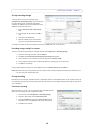
Create a rule
In this example, a camera’s input port is connected to a switch for a door. When the door is opened, a recording will start, an
alarm will be raised and emails will be sent to selected recipients.
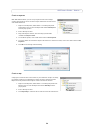
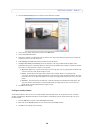
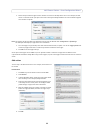
Select Configuration > Event
Configuration from the menu to open the Event Configuration Wizard. Click New to open the
New Rule dialog.
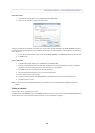
The Event Configuration Wizard helps you set up a rule for the event. The steps are highlighted on the left side of the dialog.
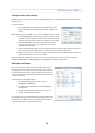
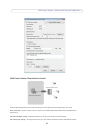
Add an I/O trigger
The first step is to add one or more triggers.
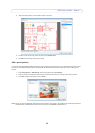
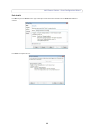
1. Click Add and
a dialog opens to choose a trigger type. For this example, choose Input/Output and the Create I/O
Trigger dialog opens.