


100
1
2
3
4
5
Introduction
Contents at
a Glance
Basic
Operation
Advanced
Operation
Advanced
Image Editing
and Printing
Editing
JPEG/TIFF
Images
Index
Processing
Large Numbers
of Images
Reference
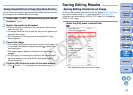
Saving Editing Results
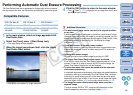
All the contents (recipe) adjusted with the tool palette (p.86 to p.93) as
well as the trimmed range (p.94) and dust-erasure (p.96 to p.100)
information can be saved to a JPEG or TIFF image, or to a separate
JPEG or TIFF image.
Select the [File] menu ` desired item.
¿Your adjustments are saved to the image.
Saving Editing Content to an Image
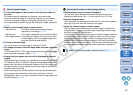
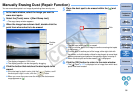
You can correct an image by pasting a section copied from another part
of the image to an unwanted part of the image.
1
Follow steps 1 to 3 in “Manually Erasing Dust (Repair
Function)”
(p.98).
2
Specify the section to be copied.
O Click on the section that is to be the copy source while holding
down the <Alt> key.
O To change the section that is to be the copy source, perform the
operation above again.
O To fix the position of the copy source, checkmark [Fix Copy
Source position].
3
Correct the image.
O Click or drag on the section you want to correct on the image. [
+
]
in the window indicates the copy source and [ ] indicates the
copy destination.
¿The copied image is pasted in the position to which it was
dragged.
O For [Pen type], you can select from [Brush] (the pasted image’s
borders simulate a brush) and [Pencil] (the pasted image’s
borders are sharp).
4
Click the [OK] button to return to the main window.
¿The [ ] mark (p.107) is displayed on a corrected image.
Erasing Unwanted Parts of an Image (Copy Stamp Function)
C OPY