


97
1
2
3
4
5
Introduction
Contents at
a Glance
Basic
Operation
Advanced
Operation
Advanced
Image Editing
and Printing
Editing
JPEG/TIFF
Images
Index
Processing
Large Numbers
of Images
Reference
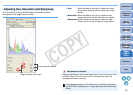
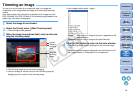
O Checking the dust erased spots
After step 3, you can display and check in detail the erased dust spots
one by one by pressing the <Shift> + <F> keys. (Press the <Shift> +
<B> keys to return to the previous dust spot.)
O Canceling a specified erased dust spot only
After step 3, you can press the <Shift> + <F> keys or the <Shift> +
<B> keys to display the erased dust spot, and then press the <Shift>
+ <Del> keys to cancel only the erased dust spot displayed.
O Switch between full screen display/normal screen display using
shortcut keys
You can also switch between full screen display/normal screen
display by pressing the <Alt> + <Enter> keys.
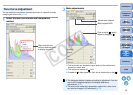
O Applying the dust erasure result to another image
You can apply dust erasure to the same place in another image by
clicking the [Copy] button to copy the dust erasure results and then
displaying the other image to which you want to apply the results and
clicking the [Paste] button.
Useful functions of the copy stamp window
For a list of the copy stamp window functions, refer to p.116.
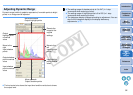
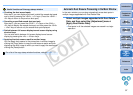
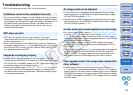
In the main window, you can also automatically erase dust spots in
multiple images appended with Dust Delete Data.
Select multiple images appended with Dust Delete
Data, and then select the [Adjustment] menu `
[Apply Dust Delete Data].
¿Dust spots in all the selected images are erased in a single
operation.
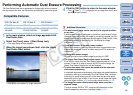
Automatic Dust Erasure Processing in the Main Window
C OPY