


98
1
2
3
4
5
Introduction
Contents at
a Glance
Basic
Operation
Advanced
Operation
Advanced
Image Editing
and Printing
Editing
JPEG/TIFF
Images
Index
Processing
Large Numbers
of Images
Reference
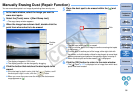
Manually Erasing Dust (Repair Function)
You can erase dust spots in an image by selecting them one by one.
1
In the main window, select the image you want to
erase dust spots.
2
Select the [Tools] menu ` [Start Stamp tool].
¿The copy stamp window appears.
3
When the image has redrawn itself, double-click the
point from where dust is to be erased.
¿The display changes to 100% view.
O The display position can be changed by dragging.
4
Click the button that matches the dust spots to be
erased.
O If the dust spot is dark in color, click the [ ] button, and if
the dust spot is light in color, click the [ ] button.
O When you move the cursor over the image, the dust erasure
range appears as [ ].
Double-
click
5
Place the dust spot to be erased within the [ ] and
click.
¿The dust spot within the [ ] is erased.
O Click on another part of the image to continue erasing dust spots
in the image.
O To erase dust in another part of the image, either right-click with
the mouse, or click the button clicked in step 4 again to cancel dust
erasure processing and perform the operation again from step 3.
O When the dust spot cannot be erased, [ ] is displayed.
6
Click the [OK] button to return to the main window.
¿The [ ] mark (p.107) is displayed on an image from which dust
spots have been erased.
Click
C OPY