36
En
1. In ( ) Review Mode, press MENU to enter Review Menu.
2. Press or repeatedly to select and highlight File Transfer.
3. Press . The next screen will display the message “Transfer all files from internal memory to memory
card”?
4. Press or to highlight No or Yes.
5. Press OK to confirm selection.
• If No is selected, no change will be made, and the LCD will return to the
previous screen.
• If Yes is selected, the screen will display “Transferring ...” and all files will
be transferred to the SD card.
Note:
1. Please insert a memory card that has 6MB or more of available memory. If the SD card does not have
sufficient memory to store all the files from the internal memory, the camera will retain the remaining
images/video clips in the internal memory and will display the message “Memory Full” as well as the
memory card locked icon ( ).
2. If the SD card is locked, the camera will show memory card locked icon ( ) for about 2 seconds and
resume to the Main Menu.
3. If no SD card is inserted in the camera, the LCD shows “No card” for a few seconds, then return to
Review menu.
ROTATING THE IMAGES
Stored images can be rotated by 90 degrees clockwise (CW) or counter-clockwise (CCW); the newly-rotated
images can then be saved and replace the originally stored images.
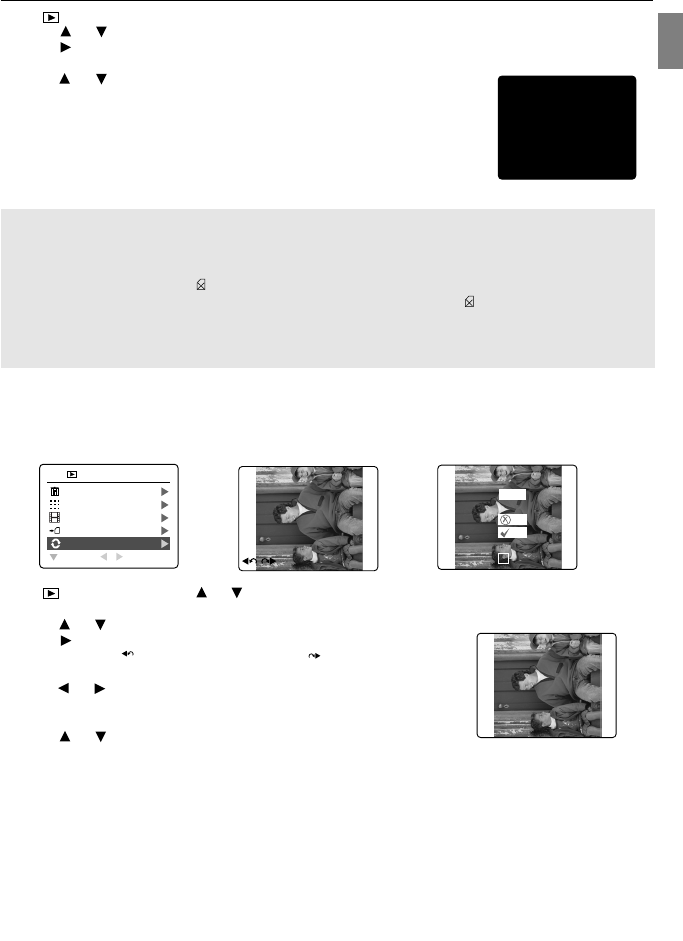
1. In ( ) Review Mode, press or repeatedly to select the desired image to be rotated.
2. Press MENU to enter Review Menu.
3. Press or to select and highlight “Rotate”.
4. Press . The selected image will be shown in full size on the LCD display.
The rotate icon “ “ (to rotate clock wise) and “ “ (to rotate counter
clock wise) will also appear on the LCD.
5. Press or to repeatedly rotate the image 90 degrees clockwise or
counter-clockwise.
6. Press OK to confirm the selection. The LCD will ask “Save?”
7. Press or to highlight “Yes” or “No”, and then press OK to confirm.
• If No is selected, no change will be made. The LCD will restore the
original image.
• If Yes is selected, the image will be rotated and saved over the original file. The LCD will show “Saving …”
first, and then show the rotated image.
X2X1
28 SEC
1 SEC
A
AWB
A
AWB
A
AWB
A
AWB
A
AWB
A
AWB
A
AWB
28 SEC
OK
Save
?
No
Yes
SET
X2X1
28 SEC
1 SEC
A
AWB
A
AWB
A
AWB
A
AWB
A
AWB
A
AWB
A
AWB
28 SEC
REVIEWING YOUR FILES
TRANSFERRING FILES...
A
AWB
A
AWB
A
AWB
A
AWB
A
AWB
28 SEC
A
AWB
A
AWB
A
AWB
A
AWB
A
AWB
A
AWB
A
AWB
A
AWB
DELETE FILE
THUMBNAIL
SLIDE SHOW
FILE TRANSFER
ROTATE
RETURN SELECT
REVIEW
1
2
X2X1
28 SEC
1 SEC
A
AWB
A
AWB
A
AWB
A
AWB
A
AWB
A
AWB
A
AWB
28 SEC
Save
...


