


R4CG230
BasicOperationGuide Rev.D
SUMMRY.fm A4 size
7/8/05
R
Proof Sign-off:
K.Yoda CRE Takehira
M. Otsuka
editor name
Summary of Panel Settings 35
English
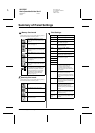
q Setup menu
Make the settings below if necessary by pressing
the q Setup button.
Paper
Feed/Paper
Eject
Feeds or ejects paper.
Ink Levels For details, see Checking the ink
supply.
Ink Cartridge
Replacement
For details, see “Replacing an ink
cartridge” on page 23.
Nozzle check For details, see “Cleaning the print
head” on page 25.
Head
Cleaning
For details, see “Cleaning the print
head” on page 25.
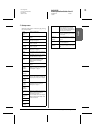
Photo Viewer
Adjustment
For details, see “Adjusting the LCD
Brightness” on page 22.
Head
Alignment
For details, see “Aligning the print head”
on page 25.
Backup For details, see “Saving your photos to
an external device” on page 10.
PictBridge
Setup
You can use this feature with digital
cameras which support the USB
DIRECT-PRINT or PictBridge
functions.
Select Folder Select a folder in the external storage
device.
Photo Sticker
Position
Up/Down
Adjust the print position for Photo
Stickers. For details, see “If the printing
is misaligned” on page 17.
Photo Sticker
Position
Left/Right
CD/DVD
Position Inside
Adjust the inside or outside diameter to
print on a CD or DVD. For details, see
“Adjusting the printing area” on page 15.
CD/DVD
Position
Outside
CD/DVD
Position
Up/Down
Adjusts the print position for CD/DVD.
For details, see “If the printing is
misaligned” on page 15.
CD/DVD
Position
Left/Right
BT Printer ID
Set
Settings are available when the optional
Bluetooth Photo Print Adapter is
connected to the printer.
For more details, refer to the “Using the
Bluetooth Photo Printer Adapter” in the
online User’s Guide.
BT
Connectivity
Mode
BT Encryption
BT PIN Code
Set
BT Device
Address
Thick Paper If your printouts are rubbed during
printing, set this to On to widen the
distance between the paper and the
print head. This setting is switched OFF
when the printer is turned off.
Language Select the language displayed on the
LCD panel. This setting is not available
in some areas.
Restore to
Factory
Settings
Reset to default settings. For details,
see “Restoring to Default Settings” on
page 22.
All File Clear Delete all images on the memory card
or the connected drive.
Screen Saver
Settings
Set to Card Data to run the screen
saver using the photos on the memory
card.