Laufwerk / Drive Mechanism
GRUNDIG Service-Technik 5 - 5
Montageschraube B
Mounting screw B
Neigungswinkel-Einstellschraube
Tilt setting screw
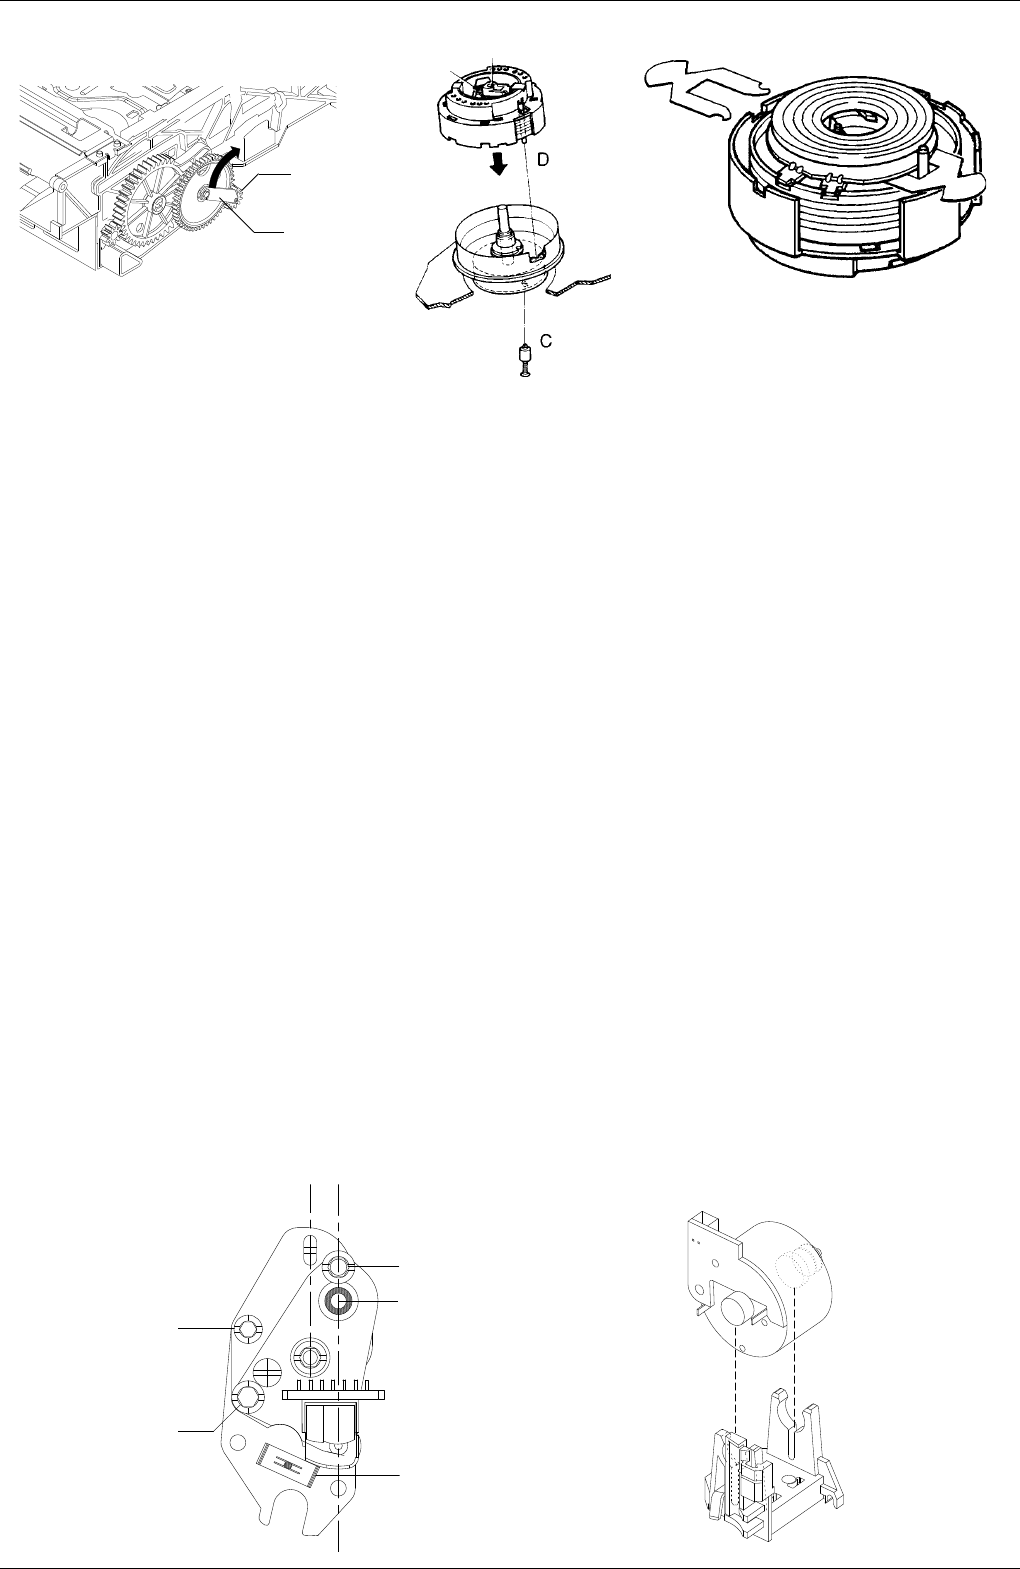
Fig. 10 Fig. 11
A
2.3 Kopfscheibe
Ausbau:
– Kopfscheibe nur mit Nylonhandschuhen anfassen.
– Referenzstift "C" (jeder Service-Kopfscheibe beigepackt) durch das
Loch im Scannermotor einschieben und die Kopfscheibe solange
verdrehen, bis dieser im Loch des Rotors einschnappt (Fig. 8).
– Klemmschraube "A" der Kopfscheibe ca. 2-3 Umdrehungen heraus-
drehen und die Kopfscheibe von der Motorachse abziehen.
Einbau:
– Vor dem Einbau der neuen Kopfscheibe kontrollieren, ob die An-
triebsachse sauber und unbeschädigt ist (die Achse muß fettfrei
sein und darf nicht mit bloßer Hand berührt werden).
– Die Kopfscheibe so aufsetzen daß der Stift "D" der Schutzkappe in
die Bohrung des Stators eingreift.
Achtung: Die obere Schutzkappe und die 2 Mylarfolien (Dicke
0,15mm) bleiben bei diesem Vorgang auf der Kopfscheibe (Fig. 9).
– Kopfscheibe in der Mitte mit einer Kraft von 1N niederdrücken
(Schutzkappe "B"; Fig. 8).
– Befestigungsschraube "A" mit einem Drehmoment von 20Ncm
anziehen.
– Schutzkappe von der Kopfscheibe abziehen und die 2 Mylarfolien
seitlich aus dem Luftspalt herausnehmen.
– Referenzstift "C" von der Unterseite des Laufwerks entfernen.
Einstellungen und Kontrollen nach Austausch der Kopfscheibe:
– Kopfradlagengeber einstellen (siehe Abgleich Kap. 3).
– Aufsprechstrom einstellen (siehe Abgleich Kap. 3).
– Bandlauf kontrollieren (Kap. 3.1).
2.4 Kombikopf (Pos. 36)
– Befestigungsfeder "A" (Fig. 10) und die beiden Stecker abziehen.
– Montageschraube "B" lösen und den Kombikopf austauschen.
– Beim Einbau die neue beigepackte Befestigungsfeder verwenden.
Nach dem Austausch des Kombikopfes sind alle Einstellungen wie
unter Kap. 3.1.2 und Kap. 3.2 angegeben, durchzuführen.
2.5 Fädelmotor (Pos. 38)
– Antriebsriemen (Pos. 39) entfernen und den Stecker des Fädelmo-
tors abziehen.
– Fädelmotor (Pos. 38) aus dem Motorhalter ziehen (Fig. 11).
Beim Einbau darauf achten, daß der Fädelmotor vorne und hinten
eingerastet ist.
2.3 Headwheel
Removal:
– Do not touch the headwheel without wearing the nylon gloves.
– Insert the reference pin "C" (delivered with each service headwheel)
into the hole on the bottom of the scanner motor and turn the
headwheel until the pin locks into the hole of the rotor (Fig. 8).
– Loosen the fixing screw "A" of the headwheel by 2-3 turns and pull
off the headwheel from the motor spindle.
Installation:
– Before fitting the new headwheel, make sure that the motor spindle
is clean and undamaged (the spindle has to be free of grease and
must not be touched with bare hands).
– Place the headwheel onto the spindle so that pin "D" on the
protecting cap engages with the hole of the stator.
Attention: The upper protecting cap and the 2 Mylar films (0.15mm
thick) remain on the headwheel during this process (Fig. 9).
– Press the headwheel down at the centre of the protecting cap "B"
(Fig. 8) with a force of 1N.
– Tighten the fixing screw "A" with a torque of 20Ncm.
– Remove the protecting cap from the headwheel and withdraw the 2
Mylar films laterally from the air gap.
– Remove the reference pin from the bottom side of the tape deck.
Adjustments and Checks after Replacement of the Headwheel:
– Set the headwheel position indicator (see adjustment, chapter 3).
– Set the write current (see adjustment, chapter 3).
– Check the tape transport (see chapter 3.1).
2.4 A/C Head (combi head) (Pos. 36)
– Remove fixing spring "A" (Fig. 10) and unplug the two connectors.
– Remove the mounting screw "B" and replace the A/C head.
– Use the new fixing spring delivered with the replacement A/C head
for reassembly.
After the A/C head has been replaced, all adjustments described in
chapter 3.1.2 and chapter 3.2 have to be carried out.
2.5 Threading motor (Pos. 38)
– Remove the drive belt (Pos. 39) and unplug the connector from the
threading motor.
– Pull off the threading motor from the motor support (Fig. 11).
When fitting the motor ensure that the threading motor locks into the
front and rear bearing.
Höhen-Einstellschraube
Height setting screw
Azimut-Einstellschraube
Azimuth adjustment
screw
A
A
B
Pos. 103H
Pos. 102H
Fig. 8 Fig. 9Fig. 7


